Posts

Showing posts from November, 2022

Stampin Up Framed & Festive Christmas Card

Image
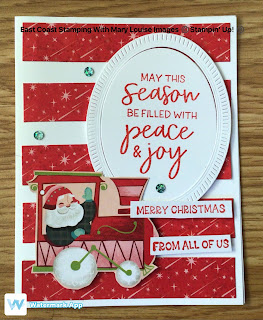
Hey peeps!  Welcome to another sketch post!  This time, I am casing the catty with a card from the Holiday Mini.  This was super fun to make and I was able to use one of my new sets, the Framed & Festive stamp and Framed Florits dies. I started with a Basic White cardbase, added some strips of Santa Express dsp.  Next I fussy cut Santa and his train (so darn cute!) and popped him up on the front.  Using Basic White again, I stamped and die cut using the Framed & Festive stamp and Framed Florits dies.  This is also popped up on the card front.  Just a few Adhesive Backed Sequins and Gems to finish it off and voila!  Now who wouldn't want to receive this cute card?  Take a look at your mini on page 32 to see how the sketch was used there.   Materials and measurements Cardbase Basic White 5 1/2 x 8 1/2; piece for die cutting DSP Santa Express image for fussy cutting; 5 pcs 4 x 3/4 Stamp set Framed & Festive Dies Framed Florits Ink Poppy Parade Adhesive Backed Sequins and G

Stampin' Up! Peaceful Deer Christmas Card

Image
 A super quick and easy card project for todays post.  I stamped on Basic White scrap using deer image and Soft Suede ink, then punched using Deer Builder punch.  A Basic White circle from the Layering Circle dies and also a Basic Black circle using the Painted Labels dies are up next.  The sentiment, stamped in Memento is from the Framed & Festive stamp set and fit perfectly in the corner of this card.  Now it's just a matter of layering the Basic Black and DSP and adhering to the card base.  Layer the Basic White circle to the center of the Painted Labels circle, adhere to card front using Stampin Seal then pop up your cute Soft Suede punched deer using Stampin Dimensionals.  Almost there....just a few Classic Matte Dots and there you have it!  See, it was quick and so easy.  Love the versatility of this card as it can be changed out with whatever dsp I have on hand and adjust the focal image for whatever occassion I may need. Materials and measurements for this card: Cardbas

Stampin' Up! Santa's Delivery Sketch Challenge Christmas Card

Image
 Oh what fun it is to craft with a friend and some great products!  Yes, that's just what I did.  Teaming up with my sideline, Andrea and using her most recent sketch, we created and had lots of laughs. Here is what Andrea created: It isn't very often that I actually follow a sketch almost to a tee, but this one is pretty close.  Poppy Parade is the cardbase, some coordinating dsp from Santa Express paper pack and some Mint Macaron for an added layer. Sentiments from the Santa's Delivery stamp set using Memento ink were used directly onto the cardbase as well as the top layer.  The images on the dsp are great for fussy cutting, so I used the train for the top layer and added some of the Snowfall Accents Puff Paint to the top of the smoke stack for added interest. All of the layering was adhered with Stampin Seal with the exception of the Mint Macaron layer which is using the Stampin Dimensionals.   I love simple layering cards that turn out extra special.  A few of the Adh

Stampin Up Abigail Rose Thank You Card

Image
Welcome to my blog, today's project showcases Stampin' Up! beautiful designer series paper and how well it coordinates with other products. I am using a sketch I found online along with a quick colouring technique I stumbled across watching you tube videos recently. The DSP used is from the Abigail Rose paper pack but I have coloured it using Stampin Blends and Blending Brushes.  I added some colour to the flowers by dabbing my Blending Brush on the ink pad and then dabbing it onto the paper.  Clearly I went outside the lines but that’s what makes it different.  I outlined and coloured the stems using Stampin Blends.  The sentiment was stamped in Gorgeous Grape onto Highland Heather scrap and hand trimmed and popped up using Stampin Dimensionals.  A coloured, fussy cut flower was added for some interest.  Some Glossy Dot Assortment embellishments were added to complete the card.     List of materials used and measurements: Cardbase: Highland Heather 4 1/4 x 11, strip for sentim

Stampin Up Storybook Gnomes Window Christmas Card

Image
Todays' post is so cute!  Aren't these forest critters so adorable?  So I was given a sketch and it's actually from the Holiday mini catalogue so I had to give it a try.  True to my sketchabilities, I did deviate just a bit but the idea is still there. I used a piece of Real Red that had already been cut using the Picture This dies and a Pool Party cardbase.  The dsp used is Storybook Gnomes, I fussy cut the gnome and the cute bluebirds.  The other two pieces were cut to fit the windows with just enough overlapping to be able to adhere to the back of the Real Red.  I popped up the gnome and the single bluebird using Stampin dimensionals and Stampin Seal for the rest of the card.  Once the dsp was placed, adhere it to the cardbase.  Using Memento ink, I then stamped sentiments from Framed & Festive stamp set onto Pool Party and hand trimmed and popped up with Stampin Dimensionals.  Embellishments included some Fine Sparkle Adhesive-Backed Gems and a Flat Jingle Bell Trin