Posts

Showing posts from January, 2023

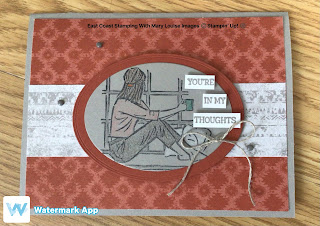
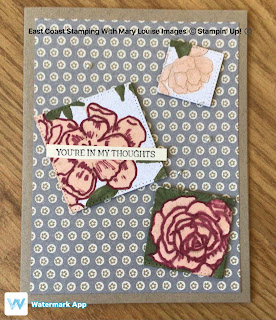
Stampin' Up! Desert Details #CasetheCatty Sympathy Card

Image
 Good day!  Mary Louise here from East Coast Stamping with Mary Louise, your independant Stampin' Up! demonstrator from Aylesford, N.S., Canada. Welcome, and let's talk about beautiful designer series paper from the new January-April 2023 mini catalogue!  Desert Details is my favourite for this catalogue with it's beautiful tones and designs.  Todays project is a sympathy card made with the Desert Details dsp and some Cajun Craze cardstock. I followed a sketch from our Demonstrator Facebook Page which cases the catalogue.  This sketch is from page 65 of the January to April Mini Catalogue.  The Framed Florets dies were used with the Cajun Craze cardstock and added to a layer of dsp.  Next I stamped the Flowers of Friendship image onto Basic White scrap using Memento ink then coloured in using a combination of markers and blender pens with ink pads. I don't have an extensive inventory of markers or blends so I use my blender pens and ink pads to fill in where needed.  I

Stampin Up Desert Details Sympathy Card

Image
 Hello, from Aylesford, Nova Scotia, Canada.  My name is Mary Louise Johnson from East Coast Stamping with Mary Louise and I am an independant Stampin' Up! demonstrator. Today's card was created from a sketch that Andrea designed and we had fun putting together during a facebook live event.  It really is entertaining when we get together even though we are from different Provinces.   I am quite enjoying the Desert Details dsp pack from the new January-April 2023 mini catalogue.  I paired it up with some Gray Granite cardstock for the base as well as the oval die cut which I stamped my image on.  Both of the ovals are from various dies in the Framed Florets Dies.  The stamp sets used ared In the Moment and Peaceful Moments-I finish the insides of the cards with sentiments and strips of dsp. After stamping the image using Memento, I coloured using my Watercolour pencils, popped up using Stampin' Dimensionals, added a Linen Thread bow with Mini Glue Dots then finished everyth

Stampin' Up! Perfectly Pencilled DSP Thank You Card

Image
Today is a new day, new project with products from a new catalogue.  The new January to April 2023 Mini.  Todays card features some die cuts from the Desert Details Dies and aren't they sharp!  I paired them up with some Perfectly Pencilled DSP from the current Annual catalogue and did some colouring.  Once coloured, I adhered the pieces to a Merry Merlot layer and then added all to the Basic Black cardbase.  A bit of fussy cutting and more colouring to add a flower to the sentiment die cut to round out the card.  This card went together quite quickly and am very happy with the results.   Materials and Measurements: Basic Black cardbase 5 1/2 x 8 1/2 Merry Merlot cardstock 4 x 5 1/8; scraps for die cuts Basic White 4 x 5 1/4 Perfectly Pencilled DSP 1 3/8 x 5; 2 1/2 x 5; strip for inside Whisper White ink; Garden Green and Merry Merlot Blender Pen Friends are like Seashells stamp set Brushed Butterflies Embellishments Stampin Seal, Stampin' Dimensionals What a fun card to create

Stampin UP Poinsettia Place Christmas Card

Image
 #throwbackthursday post!!  I'm not a huge flower lover but I do enjoy Poinsettia's and couldn't wait to dig into my retired stash to create this card.  The sketch I used has been in my stash almost as long as the dsp was and it was perfect to show off all of the pretty colours in the paper. Since I needed to make multiples for my swap, I had enough Bumblebee cardstock left to make most of my cards, one I had to switch up to greens.   Fussy cutting is something I don't mind doing and these flowers were perfect to cut up.  Using partial images in this way is great to use up all the dsp-no waste! The Bumblebee layer was embossed using the Old World Paper 3d embossing folder, then adhered to the Soft Suede cardbase.  Two strips of coordinating dsp were flagged on the bottom and layered next using Stampin Seal.  The sentiment, stamped using Memento onto Basic White was from the Itty Bitty Christmas stamp set and then popped onto a Bumblebee base.  Layering Circle Dies were

Stampin' Up! Dandy Design DSP Birthday Card

Image
Helloooo!  And welcome to my blog: East Coast Stamping with Mary Louise.  I am so excited about these cards, they are just so darn cute and bright and cheerful! Both of these cards are made using the new Dandy Designs Designer Series Paper, host option from the new January to April 2023 mini catalogue. The Adorable Owls so much fun to colour and pop onto some quick cards, such as these. Using a colourful cardbase, I then then used a piece of dsp and added a coordinating colour of cardstock and popped onto the cardbase after I had stamped the sentiment.  Then I stamped and coloured the owl onto a Basic White die cut and coloured using Stampin' Blends.  This was then adhered to a die cut using the Painted Labels dies and then popped up with Stampin' Dimensionals.  I added a few embellishments to finish off the card.  Here is the link to my   you tube video   Materials and Measurements used: Card 1: Granny Apple Green cardbase 5 1/2 x 8 1/2 Basic Black cardstock 4 3/4 x 2; scrap f

Stampin' Up! By The Bay Sympathy Card

Image
Good day, welcome to East Coast Stamping with Mary Louise's Blog! Today I am using products from the new January to April 2023 Mini Catalogue.  I love the simplicity of this dsp but also how calming it is.  I thought it was perfect for a sympathy card.  Doesn't the design of the first layer of dsp remind you of the old "Hardwood" background stamp from a few years back? Most of this card is just layering, a few die cuts and sentiment stamping.  Let's take a look:  Using a Sahara Sand cardbase, I layered a piece of By the Bay dsp on using Stampin' Seal.  Then another layer of dsp and cardstock, again adhered using Stampin' Seal.  Using Early Espresso and the Stylish Shapes dies, I cut out a circle which I adhered the sentiment die cut to.  It is on Basic White cardstock, stamped and die cut from the Something Fancy Bundle using Early Espresso ink.  This was popped up using Stampin' Dimensionals, then I added a bow with a mini glue dot using Bakers Twine

Stampin Up Starry Sky Wedding Card

Image
 Hello, it's Mary Louise here from East Coast Stamping with Mary Louise.  Today's project is a wedding card I made recently for a dear friend of mine. Her wedding colours were Blue and Silver, so pretty.  I dipped into some retired products for this card as I had a specific vision in mind.  The base is Starry Sky, which is my favourite current In Colour, I love the depth of the colour.  This is topped with a layer of Silver foil, long since retired but still in my stash.  Next is another layer of Starry Sky that has been embossed using the Filigree Frame embossing folder, yet another oldie but goodie.  I heat embossed using Silver embossing powder, the sentiment from the Petite Pairs stamp set.  Using a stitched circle die cut of Basic White, I heat embossed the cake using Silver embossing powder and my heat tool.  This is popped up in the center of the card using Stmpin Dimensionals covering some Silver Metallic Thread.  Some silver and Starry Sky flowers punched using Petite

Stampin UP Abigail Rose DSP Sympathy card

Image
 Another day, another card project!  This was another sketch challenge and yes, I went a bit rogue with it.  I swapped out circles for squares but otherwise, I was a good girl.  It starts with a Crumb Cake card base, with a layer of Abigail Rose dsp adhered with Stampin Seal.  I then die cut out three images from the Abigail Rose dsp using the Stylish Shapes dies.  I used Petal Pink, Blaskberry Bliss and Mossy Meadows Stampin Blends to colour them in.  They were popped up using Stampin Dimensionals.  Using Memento and the In the Moments stamp set, I stamped the sentiment onto a piece of Very Vanilla which I then trimmed down and adhered to the largest image using Stampin Seal.  A few Pearl Basic Jewels topped off the front.  Since I like to finish the insides of cards, I added an insert of Very Vanilla with a small strip of dsp and another sentiment. Materials and measurements: Cardbase Crumb Cake A2 size Very Vanilla 4 x 5 1/4; scrap for sentiment Abigail Rose DSP 4 x 5 1/4; scraps fo

Stampin Up Abigail Rose 3D card box

Image
 Good day!  Today's project is one I made for my sister for Christmas but you could alter the colours and design to suite whatever occassion you wish.  I have gifted various greeting cards to her in the past and she kindly reminded me in November that she was running out and needed a refill.  The cards were the easy part, but I wanted something extra special for what the cards would be in.  Since I had purchased something different in the past, this time I wanted something handmade.   I found a tutorial on Pinterest from another Stampin Up demo, Sam Hammond and followed her basic design.  I did the top my own way, but here is her step by step instructions.  Once the basic box is complete, you can decorate it anyway you wish.  I chose the Abigail Rose dsp and coloured using Stampin Blends Cherry Cobbler, Mossy Meadow and Petal Pink.  I layered this on to Crumb Cake and Early Espresso cardstock before adhering to the Cherry Cobbler box top. You will see some fussy cut flowers added

Stampin' Up! Sweetest Christmas DSP Christmas Card

Image
 Hey!  I am thinking this is my last Christmas card for 2022.  I really enjoy making Christmas cards, and I make a lot of them, but I think it's time to start switching up my projects.   This was another sketch from my side line Andrea , which we completed during a live.  I had a lot of fun creating this even though it varies a bit from her sketch.  In my stash pile, I found a Real Red die cut using Picture This and thought it fit perfectly.  I paired it with a Real Red card base, added some strips of Sweetest Christmas dsp (which were adhered from the back side of the die cut layer) and a fussy cut Candy Cane from the same paper pack.  I stamped the sentiment from the Brightest Glow stamp set in the negative space beside the candy cane, added a flat jingle bell trinket with some simply elegant trip and topped it all off with a few adhesive backed seasonal sequins.  It was a quick and very festive card that I can't wait to give away to someone special next Christmas. Measuremen

Stampin Up Caroling Mice Christmas Card

Image
Good day, folks.  When I was a child, I was involved in a couple of different youth organizations that had the opportunity to go Christmas carolling.  Some years we went into nursing homes to sing to the residents and other years we were walking along the snow lined streets near our meeting place singing to local residents.   This stamp set reminded me of all the fun I had and  couldn’t wait to order this stamp set from the holiday mini 2022 seeing all kinds of potential.  It was the hostess option, and so much fun.   I stamped the Basic White with Memento ink for each of the images.  Then coloured in with my Stampin’ Blends.  I adhered this layer onto the layer of Celebrate Everything dsp (another hostess option from holiday mini 2022), which is then placed onto the Crumb Cake cardbase using Stampin’ Seal.  I did a little stamping for the insert also, and attached a small strip of dsp before adhering to cardbase.  Now comes the snow….so much fun and a great accent to your winter card.

Stampin Up! Festive Foils Christmas Card

Image
Good Morning and Happy New Years!  Here it is the first of January and I am still posting Christmas cards.  Is that even allowed?  I hope so because I still have a few more to post.  Even though they have Christmas paper and sentiments, don't hesitate to try recreating using other sentiments and patterened papers. Todays project is simple stamping mixed with a couple of die cuts and gorgeous dsp creating a stunning card.  It is a sketch challenge that I found on Instagram and I just couldn't wait to try it.  I just love how the products coordinate so well, taking all of the guess work out of card making.  The dsp is adhered to the cardbase.  Then using the framed florets dies, cut out from the Soft Succulent cardstock and Evening Evergreen Glimmer paper.  You will end up with extra pieces for another project.  Stamp your sentiment onto the Soft Succulent piece, adhere it to the glimmer paper and then pop up using Stampin’ Dimensionals.  Some Festive Pearls were added to finish