Posts

Showing posts from November, 2023

Stampin' Up! Gift of Giving Christmas Card

Image
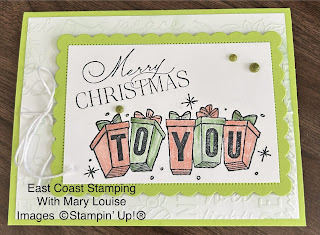
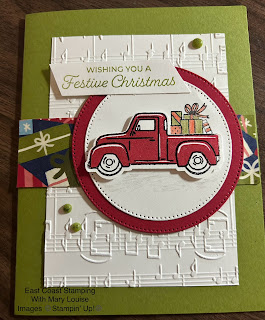
Hello!  Today is the perfect day to be tucked inside making Christmas cards.  The sun is shining bright but it's a tad chilly outside so I am planning to stay in. This project was made recently during my facebook live and I was so surprised with how well it turned out.  The orientation of my card is different than the original sketch but that’s ok! I have my favourite "Christmas" greens but thought I would try something different and used Parakeet Party.  Wow, was I in for a pleasant shock.  Totally like the results. Using the Color & Contour dies, I cut the Parakeet Party layer and the Basic White also (it's cut along the dotted lines and fits inside the Parakeet Party die cut perfectly). The first panel of Basic White is run through my Big Shot (yup, still using it!), then I brushed it lightly with Garden Green ink using my Blending Brush.  Before adhering to the cardbase, I wrapped a length of Basic White Twine around it and tied a bow.  Then using Stampin'

Stampin' Up! Christmas Tidings Christmas Card

Image
 It's the season to be making lots of Christmas cards to send to family and friends.  Here is another one that you could mass produce with ease and just a little bit of ink!   I couldn't wait to use this Christmas Tiding embossing folder so I inked it up using Mossy Meadow ink.  Then I placed a piece of Basic White card stock inside, and ran it through my Big Shot.  Yes, I am still using my old machine, even with the warped plates.  And because of that warping, the colour didn't disperse across all of the cardstock like I envisioned but I really like it this way!!!  This was then adhered to the Real Red cardbase using Stampin' Seal.  A few images from the Beary Christmas dsp were fussy cut and popped up using stampin' dimensionals.  The sentiment is from Trucking Along, stamped in Real Red onto a scrap of Basic White cardstock.  A sprinkle of Rhinestone Basic Jewels finishes the front and my usual insert with sentiment and another fussy cut image. So simple, but so

Stampin' Up! Embossed Trucking Along Christmas Card

Image
 Hey folks!  Welcome to another Christmas card project, one I totally case'd from another demonstrator from Pinterest.  I did swap out dsp and colours so not a total case, but hey!   This is such a cute card with lots of colours to pack a punch!  Who wouldn't love to get this card?  We made this one recently at our card club and the gals enjoyed it so much.  Wanna know the special touch?  Another borrowed idea from a demo...heat embossing the truck details with Basic Black embossing powder.  Yup!  Totally loving this idea. We embossed the Basic White layer using the Merry Melody embossing folder and then adhered it to the Old Olive cardbase with Stampin' Seal.  Then a strip of Beary Christmas dsp was glued across the front.  Die cuts using Real Red, Basic White and Stylish Shapes Dies were next.  Next, we stamped the truck full stamp onto a scrap of Basic White and punched it with the coordinating punch for Trucking Along bundle.  To gauge where to place your bundle of gift

Stampin' Up! Winter Meadow Christmas Card

Image
 Good Day Everyone!  I thought this card layout was very interesting.  While it does seem to be a fairly simple card to create, if you try to mass produce or swap out dsp, you can get a bit lost in the cuts.  Please don't shy away from this though, it really is a creative way to mix and match your dsp.  If you don't have dsp, you could easily make your own and then cut.  I watched a video on you tube from another demonstrator to make sure I did the cuts correctly.  In the end, it isn't about measuring at all, but making sure the stack you use are always lined up. Using three different pieces of dsp that measure 4 x 5 1/4, stack them all on top of each other.  Remember, however you have them stacked will be the layout when you swap them out.  Now you can create three different cards all from these pieces and simply shuffling them between the three card bases. Place the three pieces on your trimmer, and cut from the top left, over about 1 3/4 or 2 " from the left.  Cut i

Stampin' Up! Christmas Tidings Christmas Card

Image
 Hey!  Want to see a fun card that I made during a live with my buddy and sideline, Andrea recently?  We were following a sketch and I might have derailed a bit but I am so in LOVE with the results!  Big shout out to Leah for designing the sketch!  Using the Christmas Tidings Embossing Folder, I inked it up using the Mossy Meadow ink pad.  Then with a piece of Basic White cardstock in place, I ran it through my Big Shot.  This allowed the ink to transfer to the cardstock.  I think my plates are a bit warped because not all of the card stock got saturated in the same way but I am so in love with the oopsie that I hope to be able to do this again!   This was adhered to a Real Red cardbase with Stampin' Seal.  Next I fussy cut a couple of images for the front from the Beary Christmas cardstock using Stampin' Dimensionals.  The sentiment is from Trucking Along stamped with Real Red onto a scrap of Basic White cardstock.  I just trimmed it down and popped it up also.  I finished it

Stampin' Up! Color & Contour Sympathy Card

Image
 Hello folks!  It's me, Mary Louise from East Coast Stamping with Mary Louise bringing you another project from my #sketchingtuesday's live recently.  Even though these colours are a bit bright, I think they are still appropriate for a sympathy card.  They blend well together and offer some light during an otherwise sad time.  It seems as soon as I make a few of these cards for my stash, there are being pulled, signed and mailed lately.   A piece of Basic White cardstock was cut using the Color & Contour dies as the first layer onto the cardbase.  Next was a layer of the Stargazing DSP which was adhered also using Stampin' Seal with a final layer of Basic White which I stamped images and a sentiment onto.  The beautiful flowers were stamped onto scrap Basic White, fussy cut and then popped up using dimensionals being sure to line up with the stamped leaves.  This stamp set is a two step-so I started with the outline and used Berry Burst, then I used the full flower stam

Stampin' Up! In the Moment card

Image
Hello, and thanks for stopping by.  Today's project was created during a facebook live using some of the All About Autumn designer series paper and one of my favourite stamp sets-In the Moment. The dsp has been cut into three equal pieces and adhered to the cardbase.  Then I stamped my image and sentiment using Memento ink onto a piece of Very Vanilla cardstock.  I really enjoy colouring and thought I would bring in my Stampin' Blends to add a bit of interest to the image.  This is popped up using dimensionals and added to the cardfront.  A few gems were added to finish off the card.  The colours are soothing and the image is realistic-you can see this happening in real life.  The shelves of books featured in this dsp could easily be swapped out for other images which would totally change the mood of the card.  So many options....Hope you enjoy!  Supplies and Measurements: Copper Clay cardbase 5 1/2 x 8 1/2 Very Vanilla cardstock 3x 4 (2) All About Autumn Designer Series Paper