Posts

Showing posts from September, 2021

Penguin Place Case the Catty Card

Image
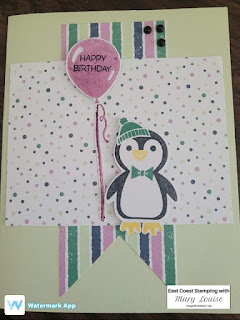
 Not sure how many cards I have already made using the cute Penguin bundle, or even just the matching dsp but when I saw  the  project on the back of the sale a bration catalogue I knew I had to do it.  I love how easy it was to put this card together.  It took some time to cut out all the little pieces.  We completed it during card club and while the gals might have shown some resistance at first, they went to work and chatted while putting it all in place.   I didn't have the beautiful white felt that the penguin is sitting on but I think it still turned out pretty good. Supply List: Cardstock: Soft Sea Foam-cut at 5 ½” x 8 ½” scored at 5 1/2” Basic White-cut at 4”x5 ¼” Playful Penguins DSP- 1 @ 5"x2"; 1 @ 3 1/2"x 3" Snow Velvet Felt-3 1/2"x1" (I omitted this as I didn't have this product) Ink: Memento; Rich Razzleberry, Just Jade; Daffodil Delight Stamp Sets: Penguin Place Bundle Adhesive Embellishments: Matte Black Dots Paper Tr

Book Binding Technique with Pansy Petal DSP

Image
Made this card recently with my club girls and they absolutely loved it.  It is so simple and can't wait to reproduce in Christmas prints to add to my Christmas giving.  We fussy cut the leaves from the dsp which some groaned about and then there's the tying of the bow.  Otherwise, it was simple layering and a couple of sentiments stamped onto cardstock.   Supply List: Cardstock: Pale Papaya-cut at 4 1/4”x 11” scored at 5 1/2” and 4 ¼” Soft Succulent-cut at 4”x4” and 1”x4” Basic White-cut at 4”x4” Pansy Petals DSP -3 ¾” x 3 ¾”; ¾” x 3 ¾”x ¾”; ¾” x 4” (for insert) 2 leaves from DSP Ink: Memento Stamp Sets: Peaceful Moments Tailored Tag Punch  Adhesive Embellishments: Playing with Patterns Resin Dots Paper Trimmer Step by Step Instructions Punch the large piece of Soft Succulent using the Tailored Tag Punch by sliding the cardstock all the way into the punch.  It should punch close to the center and will be covered up by the DSP layer. Now stamp your sentiment o

Beautifully Penned Puzzle Card

Image
 I love new layouts, techniques and folds and I especially enjoy sharing them with friends.  This card is one I have made a variation of before but never realized it had it's own name until I was scrolling Pinterest.  I don't remember who had posted it, but it is a puzzle card.  Yes, there is one piece missing in the bottom right hand corner, but when you open the card....voila!  There is the missing piece.  Too cute! I decided to use the Beautifully Penned dsp and colour it with Pumpkin Pie Stampin Blends and I love how it turned out.   Supply List: Cardstock: Basic Black-cut at 5 ½”x 8 ½” scored at 5 1/2”; 4 pieces 2 ¼”x 1 ¾” Pumpkin Pie-cut at 4” x 5 1/4” Beautifully Penned dsp-4 pieces cut at 1 ¾”x 2 ¼” Ink: Memento ink pad; Pumpkin Pie light and dark Stampin Blends and Old Olive light and dark Stampin Blends Stamp Sets: Enjoy the Moment Adhesive Embellishments: Wonderful Gems Paper Trimmer Step- By- Step Instructions:   Stamping: I stamped the sentiment in

Halloween party invitations-Stampin Up Trick or Tweet

Image
 Hands up who loves Halloween?  Or a Halloween party?  Better yet, a Halloween party for children?  I love Halloween, always have.  Our oldest daughter was born early November 1st, we thought she was going to be an October baby.  Every year for her birthday, she wanted a Halloween themed party so we did it.   We transformed our home to include webs and skeletons, glow in the dark things.  One year we made a haunted maze in our basement for the kids to travel through.  Volunteering with Girl Guides for many years, we always had Halloween parties as well.  Since my daughter is now almost 30 and I am not in a Guiding unit, I miss parties so I have convinced hubby to help me with a party for our grandson and 7 of his little friends.  We will play games, do crafts, have snacks, oh I can’t wait.  Step one were the invitations, because even littles like to get mail.  These are all set now to hit the post office in the morning and they should reach their destination by midweek of next week.  I

Hand Stamped Sentiments Color Challenge #372 Flowers of Friendship

Image
Today's #sketchintuesday project was fueled by this random sketch search from Pinterest as well as a colour challenge.  The colours were Merry Merlot, Petal Pink and Cinnamon Cider.  I substituted the Petal Pink in for Blushing Bride as I didn't have that colour...but it's in my shopping cart currently.  This isn't my normal type of card but I am happy with the results.  I decided to forgo dsp this time which I tend to lean on for my creations.  Instead, I used one of the masks from the new pack in the holiday mini-Adorning Design.   The colour challenge is from Hand Stamped Sentiments, where they offer a new challenge biweekly.  Check out their blog here:  HSSCC372   Supply List: Cardstock: Basic White-cut at 5 ½”x 8 ½” scored at 4 ¼”; scrap for sentiment Cinnamon Cider-cut at 3 ¼”x4 ½” Just Jade; Merry Merlot-scraps for flowers and leaves   Ink: Memento, Merry Merlot, Blushing Bride Stamp Sets: Many Messages and dies, Flowers of Friendship bundle Stitched So

All Squared Away Mystery Piece Challenge

Image
 I always enjoy a good mystery, whether it's a book, movie or card challenge.  Do you????  I participate in a monthly mystery piece swap where we sign up for a mystery envelope from the "hostess" and we need to create a card using whatever is in the envelope.  Sometimes, we take turns being the hostess which makes it even more interesting as we all have different ideas, supplies, etc.  So this envelope had 5 die cut pieces in it-the green die cut plus 4 small flowers from the All Squared Away die set.  Here is my take on this challenge.  If you are a card maker and would like to participate in this challenge, let me know and I can certainly get you in touch with the group. Supply List: Cardstock: Basic Black-cut at 5 ½”x 8 ½” scored at 5 1/2” Pool Party-cut at 4”x5 ¼”; scrap for flowers Basic White-4”x5 ¼” Three other colours-scraps for flowers Pattern Party dsp-3 ½” square Ink: Memento Stamp Sets: Sweet Ice Cream All Squared Away Dies Adhesive, dimensiona

Gather Together Throw Back Thursday

Image
I love being able to dig into retired treasures to create with, I had forgotten just how much I enjoyed this bundle.  Not only is it a stamp and die set but the dies also emboss on the leaves.  The detail in the embossing makes the leaves pop on your card.  I have listed supplies that are both current and retired, feel free to reproduce.  If you don't have the exact colours anymore, swap out with what you do have.   Supply List: Cardstock: Cajun Craze-cut at 5 1/2”x 8 ½” scored at 4 1/4” Basic White-cut 2 at 4” x 5 1/4”; scrap for large leaf and sentiment Pumpkin Pie; Daffodil Delight; Tip Top Taupe (retired) scraps for leaves Ink: Cajun Craze; Daffodil Delight; Tip Top Taupe (retired) Stamp Sets: Gather Together Bundle (retired) Stampin Seal, Dimensionals Blending Brushes Early Expresso Stampin Write Marker Double Scallop Punch Birch Embossing Folder (retired) Early Expresso Faux Suede ribbon-approx 3 1/2" Paper Trimmer Stampin Cut & Emboss Machine Step

Sketchin Tuesday with Peaceful Deer Bundle

Image
Another great sketch for my latest #sketchintuesday Facebook live over on my Facebook page.  A random search on Pinterest from my pal and away we go! It’s so much fun creating from a sketch and who doesn’t need another Christmas card?  Supply List: Cardstock: Basic Black-cut at 5 ½”x 8 ½” scored at 5 1/2”; scrap for sentiment Peaceful Prints dsp cut at 4 ” x 5 1/4” Basic White cut at 4”x 5 ¼” Garden Green cut at 3”x3” Sahara Sand for deer  Ink: Versamark; Soft Suede; Garden Green Stamp Set: Peaceful Deer Adhesive, mini dimensionals Double Oval Punch; Deer Builder Punch Stampin Emboss Powder-Basics (white) Wonderful Gems Paper Trimmer Heat Tool Step- By- Step Instructions:   Stamping: Using the scrap of Sahara Sand, stamp both of your deer using Soft Suede ink. I used two different tree stamps for my background stampin on the Garden Green piece of cardstock using Garden Green ink.  I started approx half way up the piece of paper and stamped from right to left to make m

Stampin Up Lovely You Fall Colours

Image
 Today's project was one I have been wanting to try for awhile now.  I have had this stamp set for over a year now and have used so many of the sentiments but never have I inked up the various floral images.  I'm glad I waited until now so I could use more fall colours, so happy with the end results.   Supply List: Cardstock: Just Jade-cut at 5 ½”x 8 ½” scored at 4 ¼”; scrap for sentiment Basic White-cut 2@ at 4” x 5 ¼” ; scrap for sentiment Ink: Just Jade; Pumpkin Pie; Cajun Craze; Daffodil Delight Stamp Sets: Lovely You Stitched So Sweetly Dies Lovely Labels Pick a Punch Adhesive, mini dimensionals Silver & Clear Epoxy Essentials Linen Thread Paper Trimmer Stampin Cut & Emboss Machine  Step- By- Step Instructions:   Stamping: Using the scrap of basic white, stamp your sentiment in Just Jade. This piece must be 1” wide, at least 3 ½” long. I started with the Pumpkin Pie ink and the largest flower image, stamping in the “corners” of the space I wan

Colouring Beautifully Penned DSP

Image
  Today, I felt like colouring so I found some dsp to colour along with my Stampin Blends and here it is.  The Beautifully Penned dsp was the perfect choice to satisfy my colouring urge.  Do you find colouring is a stress reliever?  Here are the measurements and step by step instructions.  I created this live on facebook today, take a peek over on my page. East Coast Stamping with Mary Louise Supply List: Cardstock: Basic Black-cut at 5 ½”x 8 ½” scored at 4 ¼”; scrap for die cut Calypso Coral-cut at   4”x5 ¼” Basic White-cut at 4”x5 ¼” for insert Beautifully Penned dsp-   cut at 2” x5 1/4”; image for center, approx. 2 ¼” in diameter for die cut Ink: Memento Stampin Blends: Old Olive light, Calypso Coral light and dark Stamp Sets: Peaceful Moments Painted Labels Dies; Layering Circle Dies Embellishments: Matte Black Dots Adhesive, Dimensionals Paper Trimmer Stampin Cut & Emboss Machine Step- By- Step Instructions:   Stamping: Using the Calypso Coral matte, stamp your

Pattern Party DSP with #sketchintuesday

Image
 Another wild and crazy #sketchintuesday post from last night where I create a card using a sketch that fellow demo Barb finds for me through a random search on Pinterest.  This sketch had me scratching for sure, I knew which dsp I wanted to use but couldn't decide on my shapes.  Take a look here to see what I did.  To watch my facebook live, follow me here: East Coast Stamping with Mary Louise   Supply List: Cardstock: Basic White-cut at 4 1/4”x 8 ½” scored at 5 1/2” Granny Apple Green-cut at 4 ” x 5 1/4” Pattern Party DSP-3 designs of scraps for punching Ink: Memento Stamp Sets: Peaceful Moments Tailored Tag Punch Bark 3D Embossing Folder Playing with Patterns Resin Dots Adhesive, Dimensionals Paper Trimmer Step- By- Step Instructions:   Using the Tailored Tag Punch, punch 5 tags total-2 of 2 different designs, 1 of the piece you want to stamp on. Run the Granny Green matte through the embossing machine using the Bark 3D embossing folder. Stamping: Stamp your se