Posts

Showing posts from June, 2022

Stampin Up Hello Ladybug for Challenge Showdown!

Image
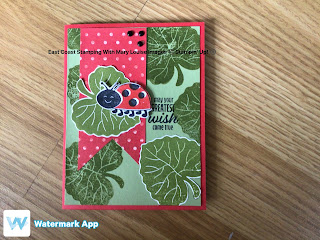
 Omg! Today, we had so much fun!  My side line, Andrea from Prairieskypapercrafts with Andrea and I went live together, we each created a card using a sketch she created.  We are almost polar opposite crafters and it showed when we showed our end results.   Here is the sketch and how I interpreted it.   I stamped the big leaf several times in Old Olive ink on a layer of Old Olive cardstock.  Then I stamped another onto a piece of Basic White and fussy cut that out.  Next I stamped in Memento ink, the ladybug image on Basic White scrap,  followed by Poppy Parade ink for her body.  I did this for the insert as well. I fussy cut the image on the scrap and popped it up onto the leaf using dimensionals. The piece of dsp was flagged on one end by cutting straight in the center up about 3/4 of an inch, then angled from each side.  One last thing to stamp, the sentiment using Memento wherever you have left a space on your leaf stamped Old Olive layer.   Now let’s put it all together.  Place yo

Stampin’ Up! Hippest Hippos

Image
 Hey everyone!  Welcome to East Coast Stamping with Mary Louise, I am, yup, Mary Louise, your Independant Stampin Up demonstrator from Aylesford, Nova Scotia.   Todays project was so cute and totally fun card to create.  It’s a good thing because it is so hot and sticky today, my craft room is like an oven.  So, let’s get to it!  This project uses a new Sale A Bration stamp set, Hippest Hippos that goes live July 1st, 2022.  How do you get these adorable hippos? Spend $60 before tax, s/h and they are all yours.  And I can help you get them!  Run one of the pieces of Basic White through your Cut and Emboss machine using the Picture This Dies.  Using a blending brush, sponge some Crumb Cake ink onto both pieces of the Basic White.  Remember to start lightly, in a circular motion and begin off the card and then bring onto your paper.   Stamp two hippo images onto Basic White scraps and one onto the piece of Basic White intended for the insert.  Using the Hippos Dies, cut out the two Hippo

Stampin’ Up! Treat Holder with Leaves of Holly Suite

Image
 Todays post takes us away from a traditional card, which is what I normally make.  Instead, it’s a cute little project you can make for a thank you to customers, table favours or a just because.  You can make it for whatever occasion you want by simply changing the sentiment and dsp.  It could also be used as a gift card holder.   I used both Old Olive and Real Red cardstock, mixing base with sentiment die cut.  Boughs of Holly dsp, Leaves of Holly stamp set and Holly Berry Dies were also used to create this festive treat holder.  It is held together with dimensionals and I added a few Pearl Basic Jewels to the front.   Want to see how I made them?   Thanks for stopping by,  Mary Louise  Want to see more  https://bit.ly/MaryLouiseSocial  

Stampin’ Up! Christmas Sweet Songbird

Image
 Todays post is another project made from a sketch provided to me randomly by my pal, Barb.  I was a bit concerned about the flagging in the upper corner but soon found a good replacement.  You just never know what I will do with a good sketch.  My initial thought was birds, but that stamp set is now retired so I went with the music notes.  Of course the Merry Melody embossing folder needed to be be added so I figured I might as well finish it off by making it a Christmas card.   Old Olive cardbase, regular A2 size.  Piece of Calypso Coral cut at 4x5 1/4.  I stamped the music notes from Sweet Songbirds using Memento ink then embossed using Merry Melody embossing folder.  This is mounted onto the cardbase using Stampin’ Seal.  A strip of Painted Christmas dsp and a banner of Old Olive stamped using Memento and sentiment from Brightest Glow stamp set.  The Old Olive strip is popped up using dimensionals with a couple of Feative Pearls.  The songbird is stamped using Real Red onto a scrap

Stampin’ Up! Flowering Fields Fancy Fold

Image
 Hey everyone,  Todays project is a beautiful card using a new to me Fancy Fold and Flowering Fields designer series paper.  There is very little stamping involved but I did use Biggest Wish and Peaceful Moments for what is involved.   Once the cardbase is cut and scored, and the other pieces are cut and scored, it’s just a matter of adhering everything, stamp a greeting and pop on some embellishments.  Cardbase-Gorgeous Grape 5 1/2 x 11 scored @ 1 3/4, 3 1/2, 5 1/4, 7; 3 x 6 scored @ 3” Basic White 2 3/4 x 2 3/4” Flowering Fields Dsp 3 3/4 x 5 1/4” for insert;  1 1/2 x 5 1/4 (3);    2 3/4 x 2 3/4” Gorgeous Grape, Blackberry Bliss ink pads Peaceful Moments, Biggest Wish stamp sets Pearl Basic Jewels Adhesive of choice With the three pieces of dsp, adhere to the accordion style panels with your choice of adhesive.  Place the large piece of dsp in the inside of the card.  Stamp using Gorgeous Grape the sentiment onto the Basic White square and then adhere to the dsp insert.  Next stamp t

Memories & More Come Sail Away Masculine Birthday Cards

Image
 Good day all; Todays post features a long time favourite suite that has now retired but I am still enjoying the products.  I am involved in a monthly swap and the theme this month was to use three in a row from a tic tac toe so I chose Masculine, Birthday and Punch/Die Cuts.  These products were perfect for this challenge.  Let's take a look. I needed to make 5 cards but I only had  enough cards large enough from the Memories & More card pack for 4 so I improvised and created my own dsp for the last one.  These card packs come with so many elements, cards of different sizes, die cut pieces and even laser cut pieces which I didn't use on these cards...but I will soon! Cardstock used: Cardbase: Night of Navy/Soft Suede-4 1/4 x 8 1/2 Layer: pieces from card pack/Crumb Cake 4 x 5 1/4 Insert: Basic White 4 x 5 1/4 Stamp sets: Sailing Home, Penguin Place Come Sail Away Memories & More Card Pack Inks: Night of Navy, Soft Suede Linen Thread Matte Black Dots Dimensionals Blendi

Stampin' Up! Sweet Songbirds Congratulations Card

Image
Good day! Todays sketch is a special one as my good friend and side line Andrea created it.  I was a bit nervous as I really wanted to do a great card and I figured she would be watching my Facebook live as I created it.  And she did! But just like Mikey, she liked it!  ( in case you don’t know Mikey, he was a fussy kid on a commercial for Life cereal a few….years back.  He liked  very little but liked the cereal, but anyways. ) What I enjoy about sketches, as that they are outlines or guides to help get your creativity going if you are stuck for ideas.  You have options, you can completely case (copy and share everything) or you can do your own interpretation.  The sky is the limits! Let’s just say, I didn’t case it, lol.  This card will be going in the mail tomorrow, a good friend of mine just accepted a new Girl Guide position and I think this is perfect for her.   Here’s what I used: Sweet Songbirds bundle Old Olive, Fresh Freesia, Crushed Curry, Basic White cardstock Old Olive, Bl

Stampin' Up! Sympathy with Rose Wonder and Love Blossoms DSP

Image
Hey there, welcome to East Coast Stamping with Mary Louise's blog!  I am an independent Stampin' Up! demonstrator from Aylesford, Nova Scotia.  I have been stamping for close to ten years and going on eight years as a demo.  I like to craft with paper, yarn, thread, cloth, etc.  Today's post will be focusing on a card using materials from the retired vault, someplace I like to visit often.  I participate in a mystery challenge in a group with other crafters, this month I actually provided the pieces to create with to everyone.  All participants were given a die cut rose and label for a sentiment.   I used Rose Red (remember that colour?) cardstock for the die cuts from Rose Wonder bundle, added a piece of Love Blossoms dsp (yup, another oldie!) to the rose die cut piece as well as a piece for the insert.  The front layer is Basic White embossed with Old World Paper embossing folder (not that old but not current) where I added some Blushing Bride ink using a blender brush. 

Stampin’ Up! Black & White Slimline Card

Image
 Good day everyone,  Todays project is a slimline card using some soon to be retired dsp from the January - June 2022 mini catalogue.  I haven’t made a slimline in quite awhile, so thought it was time.  Let’s take a look at what I made and the materials too.  Cardbase: Basic Black cardstock cut at 7x8 1/2, strip for center Basic White cut at 3 3/8 x 8 3/8 (2), scrap for daisies Abstract Beauty DSP 3 1/4 x 6 cut on diagonal, corner to corner, strip for inside Daffodil delight and Memento ink pads Friends are like seashells and Hello ladybug stamp sets Versamark, white embossing powder and Heat tool Pearl basic jewels Blending brush Dimensionals Bone folder I folded the cardbase in half and creased with bone folder.  I adhered the two pieces of dsp to white layer and then added that to the cardbase.  Then I heat embossed the sentiment onto the black strip and added to the center of the card.  For the insert, I stamped my sentiment using Memento, then added a few daisies on one side using

Butterfly Kisses Hello Card

Image
 Phew!  Ever have one of those days(or more than one!) where you just can't seem to get where you want to be?  Once I completed my facebook live, I just left my craft table and walked away.  Two days later and I am just getting back to write my post for today and tidy up my desk.   So this weeks sketch challenge ended up pretty cool-it was a fairly simple design with all kinds of options given the sketch.  I also decided to use some of the new DSP from the recently released 2022-2023 Annual Catalogue.  Let's take a peek at what I used and how.... Cardbase: Basic White-4 1/4 x 8 1/2 Cardstock banner: Starry Sky-1 x 4 1/4 DSP: Butterfly Kisses-4 x 5 1/4; 1 x 4 1/2; 3/4 x 3 3/4; 1/2 x 5 1/2 for inside Stamp Set: Forever Fern Linen Thread Classic Matte Dots Once your pieces are all cut, and your greeting stamped onto one of the banners, the rest is pretty easy.  I layered all of the pieces using Stampin Seal, including a scrap for the inside too! The patchwork look butterfly is jus

Fancy Fold using Symbols of Fortune DSP

Image
 Happy Monday!  Today I am enjoying crafting while the sun shines in my windows!  It's so nice to be able to work with the curtains open and use the natural light. My post today is creating a new to me fold and boy did it have me stumped for a bit. I found a couple of different versions on Pinterest and made it my own and am so happy with the end results. I wanted to showcase some of the soon to be retired Symbols of Fortune DSP-some of which I actually fussy cut for the front and back of the card. Crumb Cake Cardbase: 4 1/8 x 10 7/8.  Score at 6, 7 1/8, 9 and 10 1/8"; 3 x 6.  Score at 1/2x 1/5/8" DSP-Symbols of Fortune: 4 x 4 3/8; 4 x 1 5/8" Basic White: 3 3/4x 5 5/8; 2 3/4 x 4 1/8" Soft Succulent and Evening Evergreen cardstock scraps Sweet Songbirds Stamp set Double Oval Punch Embossing Folder-Bark 3D Memento and Calypso Coral ink pads Blending Brush Dimensionals Rhinestone Basic Jewels Burnish the score lines of the Base card.  Add the dsp with Stampin Seal.

Baby Card using Places in the Heart from Stampin' Up!

Image
 New life, new stamp set and new dsp.  Hey everyone, I hope everyone is having a great day.  As I write this blog, the sun is shining, the birds are chirping and it’s still coolish for first of June.   The sketch I used recently had me intrigued to try another project using totally different products.  This one is showcasing stamp and dsp in the new Annual catalogue 2022-2023.  With all this new, I chose to create a new baby card.  For 2 years we haven’t had baby showers to attend, totally miss that.   I was trying to find as many gender neutral colours as possible but still looking fresh so it could be used no matter the gender.  Think I nailed it.  I stamped the mom/baby image from Places in the Heart stamp set on Basic White cardstock using Memento and coloured using So Saffron, Ivory, Bronze, Old Olive.  The sentiment was added next, also using Memento and then some speckles created a border using Soft Succulent.  Then the Open Weave Pale Papaya ribbon was wrapped to the back of th

Come Sail Away for #tbt

Image
 Good day folks, Happy Thursday!  Todays #tbt project was so much fun to create and I dug deep into my retired stash for my goodies too.  As yet another retiring list was published yesterday, it is bittersweet to say see ya later on…and hello to new stuff.   Memories and more card packs have soooo many items, great variety of them.  It makes card creating so easy.  This particular pack, Come Sail Away is fabulous.  I chose a couple of the Mossy Meadow cards and sentiment sticker to pair up with a Mossy Meadow cardbase.  While searching through my Basic White scraps for a piece large enough as a layer, I found one perfect for this card and it was already embossed using the Tiny Triangles embossing folder.  I used my blending brush with Mossy Meadow and added some colour to the embossed piece as well as the insert.  It’s finished off with some Matte Decorative Dots.  I just love it! Oh, and I used the Family Party stamp set.  What dad wouldn’t love to get this card?  Thanks for dropping

Heart & Home for the finish! #sketchintuesday sketch challenge

Image
 Good day folks, My intent for this card was to showcase some of the products that were hitting the retired list today, giving them one last hurrah before they were shuffled from my current pile to retired.  This doesn't mean they won't ever be pulled back out to be used, on the contrary!  Once I started to put pieces together, I realized that I was using a few items all from the same suite-certainly not intentional but oh well. The sketch provided to me from Barb had me a bit perplexed at first...I usually sweat when she sends me "busy" sketches and hope for a simpler one.  This was certainly a calm one but it still had me stumped.  So I started out with what I could use for the layers and the rest just fell into place.  Of course I added my own spin to it :)  Cinnamon Cider cardbase-5 1/2x 8 1/2, scored at 4 1/4. Pale Papaya layer-4x 5 1/4, scrap for circle die cut Basic White insert-3 1/2x 4 3/4 Heart & Home DSP-3 1/4x 4, strip for insert Hive 3D Embossing Fold