Posts

Showing posts from December, 2022

Stampin' Up! Boughs of Holly DSP Christmas Card

Image
Good day!  Today's project is using a piece provided to me from a group where we do mystery piece challenges.  The mystery piece can be a piece of dsp, a die cut or two or even a couple of die cut (non stamped) images.  This particular challenge is the white die cut from the Holly Berry dies set.   My cardbase is Basic White with a layer of dsp from the Boughs of Holly paper pack, and then another layer from the same pack.  Using some Basic White scraps, I stamped the holly berries using Cherry Cobbler and then die cut them out.  Shaded Spruce and Mossy Meadow scraps were also used to die cut some pine needles too.  I then stamped the sentiment using Shaded Spruce ink and adhered all together using Stampin' Seal.  Some Pearl Basic Jewels added just enough to finish off the card.  I really enjoy the convenient way that Stampin' Up coordinates their products to make card making stress free.   Measurements and materials used: Basic White cardbase A2 size; scrap for sentiment d
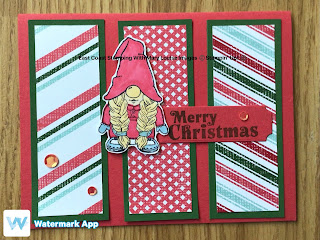
Stampin’ Up! Kindest Gnome Christmas Card

Image
A cute image and some festive dsp make for a quick and easy Christmas card.  Welcome to East Coast Stamping with Mary Louise.  This card was created during a live with Andrea where we both created using a sketch she designed.  I might have gone off the sketch a weee bit, but not by much. I stamped the image using Memento onto a scrap of Basic White and fussy cut it out.  Next I coloured using Stampin’ Blends.  Then I adhered the dsp to the cardstock strips and then to the cardbase.  Stamp your sentiment onto a scrap of Poppy Parade cardstock that has been die cut from the Holly Berry die set.  Adhere that and the gnome to the layers on the front and add your embellishments.  Let’s take a look…. Measurements  Poppy Parade cardbase; scrap for sentiment die Garden Green 1 1/2 x 4 (3) Sweetest Christmas dsp 1 1/4 x 3 3/4 (3) Kindest Gnomes, Santa’s Delivery stamps Holly Berry Dies Memento ink Stampin’ Blends Real Red, So Saffron, Night of Navy Stampin Dimensionals, Stampin’ Seal Adhesive

Stampin Up Boughs of Holly Christmas Card

Image
Todays project uses a sketch I found from another stampers blog and decided to give it a go!  The large poinsettia image from the Boughs of Holly DSP was the perfect fit for this particular sketch.  It left just enough space on the card front for a sentiment and a bit of colour.  Heat embossing using Black Embossing Powder was a fun choice also. For this card, I used Versarmark to stamp the sentiment, sprinkled the Black Embossing Powder over the top, tapped off the access.  Then, using my heat tool, I melted the powder.  I love how you can watch the transformation.  Be careful not to keep it in one spot for very long because you can scorch the cardstock.  Pear Pizzazz was used with my Blending Brush to add a bit of colour to the center of the card and also a bit around the edges.  The poinsettia was fussy cut from the Boughs of Holly DSP pack and popped up using Stampin Dimensionals.  A few of the Rhinestone Basic Jewels finished off the front of my card.  Here are the materials and m

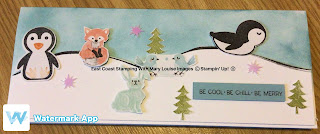
Stampin Up Penguin Place Slimline Christmas card

Image
Doesn’t this make you want to coasting?  Hello and welcome to my blog for today.  This card was so much fun to make, reminds me of childhood winters.   This sketch caught my eye, but I changed the orientation to create this cool slimline card.  The images are either fussy cut from the Storybook Gnomes dsp or stamped and punched using the  Penguin Place bundle.  Using my blending brush and the Balmy Blue ink pad, I created the sky effect by rubbing lightly over the Basic White cardbase.  On a scrap piece of Basic White, I stamped the “hill” stamp using Memento and then fussy cut.  This will give you the sloped hill look.  Adhere to the cardbase using Stampin Seal.  Next add your images, some using adhesive and others Stampin Dimensionals.  The sentiment is stamped on a small scrap of Balmy Blue cardstock using Memento ink and adhered to the cardfront.  Don’t forget to add some snowflake embellishments!  Basic White cardbase 7x8 1/2; scrap approximately 3 x 8 1/2 for “hill” Scrap of Balm

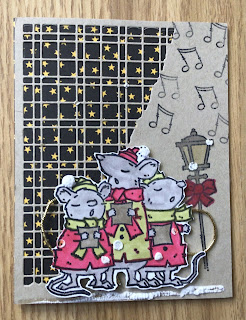
Stampin Up Caroling Mice Christmas Card

Image
Helloooo everyone!  Today's post wasn't a sketch challenge for me!  Say what?  I know, but it was still just as fun and a fun card is the result!  I am in a group where we do monthly mystery challenges using whatever materials are given out that month.  This month I received in my envelope, the Crumb Cake die cut using the Split Card Textures die.  This is a super cool die, which I don't have and might need to add to my ever growing shopping list.  I paired this die cut up with the fun Caroling Mice stamp set (hostess stamp from Holiday mini 2022).  The dsp kind of set the mood for an evening of caroling with friends, it is from the Celebrate Everything paper pack (also free to hosts from Holiday Mini 2022).  I stamped the mice onto Basic White cardstock with Memento and coloured using Stamping Blends.  Music notes and the pretty lampost were stamped directly onto the die cut piece using Memento.  These were adhered to a Crumb Cake cardbase using Stampin Seal. The mice were

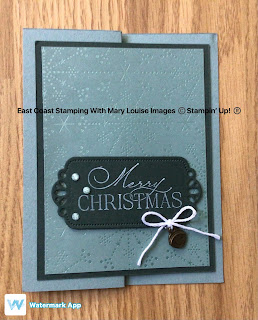
Stampin Up Festive Foils Christmas Fancy Fold Card

Image
I love fancy folds so this one was perfect to add to my stash to use this upcoming holiday season.  The Soft Succulent cardbase is scored twice, which enables you to fold back the front flap.  After layering the Festive Foils dsp onto the Evening Evergreen layer, adhere (remember to only put adhesive on the left half of the layer) to the flap.  Next, cut out your sentiment piece using the Lights Aglow dies, then stamp your sentiment using Whisper White ink.  Pop that up on the front using Stampin Dimensionals, then add some Fine Sparkle Adhesive Backed gems.  The finishing touch, tie a bough with the white twine onto the Flat Jingle Bell Trinket and adhere to the sentiment using a Glue Dot.  When you unfold the front, it will fit nicely into the center of your card and ultimately be the same size as a regular card.   Materials and measurements Cardbase Soft Succulent 5 1/2 x 8 1/2 scored at 4 1/4 and 2 1/8 Evening Evergreen 3 3/4 x 5; scrap for die cut Basic White 4 x 5 1/4 DSP Festive

Stampin Up Sweetest Christmas Card

Image
Welcome back to East Coast Stamping with Mary Louise.  Today's post follows a sketch I found on pinterest and it proved to be an effective sketch.  Not only was it quick and easy, it makes a cute card.  Your supplies needed are minimal, unless you really want to dress it up.  Sweet Sorbet isn't a colour I would associate with Christmas cards but it worked out quite well since I used the Sweetest Christmas DSP pack.  Cut some strips, adhere to the cardbase and add your focal image and sentiment and presto!  The candy cane was fussy cut and popped up using Stampin Dimensionals and a little gold bow added using the Simply Elegant Trim.  The sentiment is from the Framed & Festive stamp set and stamped using Memento ink.  Adhesive Backed Seasonal Sequins add the finishing touches.  Could easily mass produce this sketch and also, swap out the dsp for what ever occasion you need for cards.  Love when that happens.   Materials and Measurements: Cardbase Sweet Sorbet 5 1/2 x 8 1/2;