Posts

Showing posts from June, 2023

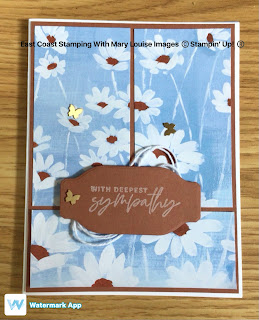
Fancy Fold Stampin' Up! Sympathy Card

Image
Oh how I love the feeling of reducing the amount of "stuff" in my craft stash.  It's almost as uplifting as when I purge a closet or drawer.  Can you relate?  Today's project is a new to me fold but I dug into some recently retired dsp and created a beautiful sympathy card for my stash.  I love bringing new life to something that has been placed neatly away.  The instructions for this fold are quite easy, I found them online from another demo and am enjoying the results.  Once you have prepped all of the supplies, we will put everything together.  I am a firm believer of doing a dry assembly first when trying a new to you fold and also to stamp before you adhere to anything.  If you decide to dry assemble first, you will be able to see where to stamp your inside sentiment (if you want one).  Please stamp your sentiment now.  With the smaller piece of cardstock, which you have already scored along the short side, add some adhesive to only the 1/2" back of the fold

Stampin’ Up! Bright and Beautiful Birthday Card

Image
 Good day folks!  I hope you are having a great one.  Creating with paper and ink always makes me happy even if there is a challenge of a new sketch or technique involved.  Today's project is a quick and easy sketch that would be fantastic for helping to use up scraps from your paper stash.  Using full layers of designer series paper is easy but always leaves behind beautiful pieces that you just can't ever seem to toss.  And why should you as there is still lots of life left and so many options for putting together some great projects. Using a Basic White cardbase, I adhered a piece of Bright and Beautiful DSP using Stampin' Seal.  Next I added three strips from the same paper pack, again using Stampin' Seal.  There was even a strip left for the inside of the card.   Have you made anything yet using the new Azure Afternoon colour?  I am so pleased with the blue offerings right now in the current Annual catalogue.  The oval frame I chose is from the Framed Florets Dies

Stampin' Up! Slimline Birthday card with Alphabest Bundle

Image
 Today's sketch kind of threw me off, I just couldn't see where I wanted to take it.  I thought flowers at first but I currently don't have the "right" flower for this.  Then my mind went to letters and the Alphabest set which then morphed into a slimline card.  Isn't it funny how once you start with something, everything falls into place and then you wonder why you struggled?  Ugh.  So I started with a Basic White cardbase with a layer of Countryside Inn DSP adhered using Stampin' Seal.  I stamped a sentiment on the inside with a strip of dsp for the bottom also.  Spelling out Happy Birthday, then I stamped using Night of Navy ink onto scraps of Misty Moonlight cardstock.  Then I punched them all out and popped them up on the card front along with a simple White bow from the Baker's Twine Essentials Pack.  A sprinkle of Rhinestone Basic Jewels finished off the card and it's so cool!  If you would like to see how I put it all together, and join in

Stampin' Up! Fresh as a Daisy DSP Sympathy Card

Image
When I first started trying to decide how I wanted my card to resemble the sketch, I reached for the Fresh as a Daisy dsp.  This panel was just the perfect size for a card front but I needed something extra to make the card extra special.  I reached for my Cloud Punch and decided to add my own cloud to the scenery.  After I punched one using scraps of Basic White, I added a bit of Azure Afternoon using my blending brush.  Just enough to lend a bit of colour and not be so stark.  Then I heat embossed my sentiment using Black Embossing Powder. The panel of dsp was added to a Wild Wheat cardbase using Stampin' Seal.   A small length of Wild Wheat ribbon adhered to the card front, then the punched cloud popped up with dimensionals added the right touch.  I followed that with a few Wild Wheat embellishments from the 2023-2025 In Colour Dots.  For the insert, I used the negative space from the strip of Basic White that I punched my cloud from, positioned it where I wanted my sentiment an

Stampin' Up! Fresh As a Daisy Sympathy Card

Image
 Hello!  It's Mary Louise here, from East Coast Stamping with Mary Louise.  Do you prefer to craft alone or with a buddy?  How are you most productive-alone or with a buddy/group?  In person or virtual or does it really matter????  Oh I am asking all of the questions today!  I personally prefer with a buddy but I craft alone also.  I likely get more done with other people because then I set more deadlines than alone.  And to be honest, as much as I enjoy going out to see people, I can be just as comfortable at home, via teams/zoom/fb and craft along with a group.   Today I am crafting with a buddy, Andrea!  She created our sketch and we both used different products which resulted in different projects.  Both were very nice and both very close to the sketch for a change. When Andrea sent me the sketch I knew exactly what I wanted to do.  I had recently purchased the Fresh as a Daisy DSP and remembered this piece and thought it fit well.  There is a similar sketch that I have used ma

Stampin' Up! Countryside Inn DSP Thanks card!

Image
I am sooo in love with this dsp!  The Countryside Inn dsp has got to be my favourite dsp ever with it's beautiful hues of blues and choice of designs.  It just makes it so easy to create with but difficult to choice another.  If you would like to watch as I put the card together, follow me here:  https://www.facebook.com/eastcoaststampingwithMaryLouise For this card, I wanted to showcase my newest purchase...the Alphabest stamp set to go with the punch I bought last year.  After doing some looking around Pinterest, I was able to put adhesive to paper and create!  I adhered the layer of dsp to the Misty Moonlight cardstock and then to the Night of Navy cardbase.  I stamped onto scraps of Basic White using Misty Moonlight and the cute background stamp six times.  Then I stamped the letters for "thanks" using Night of Navy and finally punched them out.  They are adhered to the tag die cut from the Countryside Inn dsp which has been popped up using Stampin Dimensions.  I used