Posts

Showing posts from May, 2023

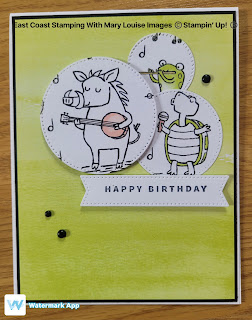
Stampin' Up! Sweet Songbird Birthday Card

Image
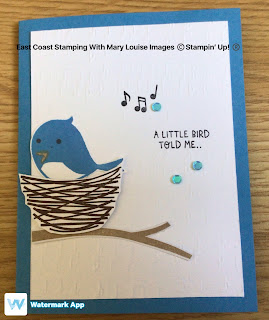
 Hello! from Aylesford, Nova Scotia.  Today's project features a sketch I found online and the Sweet Songbirds stamp set.  I seem to be a bit obsessed lately with all the pretty birds visiting me and of course, their lovely songs.  I even downloaded an app on my phone which identifies the birds from their sounds.  It is amazing how many different types there are. So with this card, I used the Merry Melody embossing folder with a piece of Basic White and ran it through the Big Shot.  Then I stamped a sentiment and some music notes in some flat spaces using Memento Ink.  This can now be adhered to the Azure Afternoon cardbase.  Oh, I love this already.  I think it's my new favourite blue...next to Night of Navy!  On some Basic White scraps I stamped the branch using Crumb Cake, nest using Early Espresso and the bird using Azure Afternoon.  Then I fussy cut them all out.  Eyes and beak were stamped in using Memento and Crumb Cake.  Adhere the branch and bird using your favourite a

Stampin' Up! Something Fancy Birthday Card

Image
Today, I get to play with all the pretty papers...the Countryside Inn Designer Series Paper to start and then some Misty Moonlight to compliment them.  This sketch is so much fun to use, and I have used so many pretty combinations of it using different colours, alternating dsp, sentiments and embellishments too!  I tried to keep it less feminine, hoping to be able to put this in my masculine stash but we will see. Lots of simple layering with the dsp and cardstock to start off with.  Then I ran the Night of Navy and Misty Moonlight cardstock through my Big Shot with the Framed Florets Dies-this way I was able to have the dark outer ring with the lighter colour center.  Bonus will be that I have another set, just the opposite for another time.  I stamped the sentiment from the Something Fancy stamp using NIght of Navy onto the Misty Moonlight center.  The entire center focal image is popped up using Stampin' Dimensionals.  I added a few of the Iridescent Rhinestone Basic Jewels to t

Stampin' Up! Zoo Crew DSP Birthday Card

Image
Here we are again!  Another day and another great sketch and another chance at showcasing some of our beautiful Designer Series Paper! Welcome to East Coast Stamping, Independant Demonstrator from Nova Scotia. Todays card uses minimal products but is super cute.  I love how there are images large enough to die cut or fussy cut without having to purchase the stamps and dies (but if you want to buy them, I can totally help you out!) The Pretty Peacock cardbase works perfectly with the piece of Bright & Beautiful DSP which is layered with adhesive.  Zoo Crew DSP image is die cut using the Something Fancy Dies.  There are two pieces of Pretty Peacock also cut from the same dies.  Sentiment is stamped using the Biggest Wish (insert) and Sweet Songbird stamps.  I did use a piece of retired ribbon to string through both pieces of paper and then tied that with a piece of Black Bakers Twine.   Materials and measurements: Pretty Peacock cardstock 5 1/2 x 8 1/2; scraps for die cuts Basic Whit

Stampin' Up! #throwbackthursday with How Sweet It Is DSP

Image
 Hello!  And welcome to my blog!  Today is a #throwbackthursday post, I hope you take a trip down memory lane with me. A few years ago,(2019) this DSP-How Sweet It Is was released.  Oh the pretty colours!  Coastal Cabana, Melon Mambo, Goergeous Grape, Granny Apple Green and Pineapple Punch.  Some of the images were nice and big-cupcakes, candy jars and oh so easy to fussy cut.  I think I ordered this as part of a "halvsies" with my upline and used so much of it while it was current.  Once it retired, I trimmed the pieces to fit one of the Stampin' Storage cases and tucked it away, using it every once in awhile.  Well this week, I decided I needed to clean up those scrap pieces and make some cards with it.  Win win for me as I always need cards in my stash and I really needed another empty case to transition the most recent catalogues offerings of retired dsp into. Thanks to pinterest and great demonstrators for some inspiration, I was able to create a few and alas, my sto

Stampin' UP! Hello Ladybug Birthday Card (needs photo)

Image
 Hello, and welcome to my blog.  I am Mary Louise from East Coast Stamping with Mary Louise, your independant Stampin' UP! demonstrator from Nova Scotia. For those that know me, know my love of sketches.  Today's project is from a sketch from my pal, Andrea but it is also quite similar in design to one I completed previously.  You may just have to scroll back to find it.  Of course, I didn't make the same card but stayed pretty close to the actual sketch.   I did create my own dsp using Basic White cardstock, stamping the leaf and flower images from the Hello Ladybug stamp set, using Granny Apple Green and Real Red.  To achieve the lighter colours, I just stamped several times without reinking my stamp.  Once I achieved the look I wanted, I trimmed the paper into strips, applied them to the layer of Zoo Crew dsp which was then adhered to the Basic Black cardbase.  I stamped the ladybug and wings onto Basic White scraps using Memento and Real Red, then fussy cut and popped

Stampin' Up! Bright and Beautiful DSP Birthday Card

Image
 Hey There!  I always love a new fun fold and couldn't wait to try this one.  It was a little different as you can only fit one cardbase to an 8 1/2 x 11 sheet of cardstock.  More of the new colours and papers were used to make this card.  Yellow has never been one of my go to colours, so wasn't sure how the Lemon Lolly cardstock was going to fare, but  I am very pleased with the results.  The Bright and Beautiful DSP is layered onto the Lemon Lolly cardstock using Stampin' Seal-be careful of the direction of the dsp and the design and don't adhere until you figure out where you want your pieces.  To guage placement of your inside sentiment, just lay your basic white insert inside the card to stamp. Then you can adhere it to the inside-I try to always stamp before I adhere just in case!  Die cut squared image from the Zoo Crew DSP using the Stylish Shapes Dies is the front focal piece.  This is only adhered partially, be careful not to apply adhesive on the back entirel

Stampin' Up! In the Moment Birthday Card

Image
Good day, and welcome to my blog.  Todays' project was based off a sketch I found on another demo's site and thought I would give it a try.  What a great opportunity to show off some pretty dsp!  I layered the Bright and Beautiful dsp onto strips of Berry Burst cardstock, then adhered them all to the front of the card.  Next, I stamped the image from the In the Moment stamp set, coloured using blends and added a bit of stella to make the beverage shimmer.  This was popped up using dimensionals with a length of Silver trim underneath for added effect.  The sentiment is stamped using Memento onto a strip of Berry Burst and cut using the Timeless Arrangements dies and popped up also.  A few of the Silver Festive Pearls finished everything off.  Was a quick card, with the colouring taking the bulk of the time.  I can't wait to do this with more of my pretty stash of dsp.   Materials and Measurements: Berry Burst Cardbase 4 1/4 x 11; 5@ 1 x 4; scrap for sentiment Basic White car

Stampin' Up! Zoo Crew Birthday Card

Image
Hello, and welcome! Mary Louise here from East Coast Stamping with Mary Louise with another one of my #sketchintuesday creations.  The sketch is one I found online and I couldn't wait to begin.  Since I first laid eyes on the Zoo Crew DSP, I knew it was going to be fun to work with and it hasn't dissapointed me so far.   Using a Basic White cardbase, I added a layer of Basic Black cardstock and then another of the Bright and Beautiful DSP.  After die cutting a few images of the Zoo Crew DSP with my Stylish Shapes Dies, I adhered two of them to the dsp layer and popped up the largest image using Stampin' Dimensionals.  The sentiment is stamped in Memento ink on to Basic White cardstock and die cut from the Stylish Shapes Dies and popped up also.  A few of the Classic Matte Dots completed the card and it is so cute!!  Can't wait to give this one away, it's just a fun card.  Materials and Measurements: Basic White Cardstock 4 1/4 x 11; scrap for sentiment die cut Basic

Stampin' Up! Countryside Inn DSP card

Image
Todays card was created with my monthly stamp club gals and I just love it.  I had seen a card with this layout online and new I had to use it but feature different products.   Hi, welcome to East Coast Stamping with Mary Louise blog.  This card shows all kinds of new stuff…Boho Blue cardstock, Countryside Inn designer series paper and Timeless Arrangement bundle.  There is lots of layers but it goes really quickly and then you get to put all those pretty colours together.   You can put your pieces together using whatever adhesive you are most comfortable with, I prefer Stampin’ Seal.  Once you have all of the layers put together, die cut out the leaves from the timeless arrangement bundle from Boho Blue cardstock and adhere to the card front.  The sentiment is from the same stamp set, stamped using Night of Navy onto a die cut piece of Basic White.  This sentiment is popped up using Stampin' Dimensionals.  A few 2023-2025 In Colour Dots finishes off this simple but very fun card.

Stampin' Up! Timeless Arrangement Bundle Thank You Card

Image
Good day!  And welcome to my blog, East Coast Stamping with Mary Louise.  Today is all about colour...colouring, choosing colours, colour challenge.  Andrea created the sketch but with a colour challenge twist as well.  We each chose two colours and put them al together to create.  What a pleasant surprise!  So my colours were Flirty Flamingo and Calypso Coral....surprised???? I used the Tahitian Tide cardbase and layered it with a panel of Countryside Inn DSP-so in love with all the pretty blues!  Then using a panel of Basic White, I stamped using elements from the Timeless Arrangements stamp set using Night of Navy and Calypso Coral.  Then I die cut the flowers, coloured using Flirty Flamingo and Calypso Coral and added some Old Olive.  Those are popped up using dimensionals.  The sentiment is stamped using Night of Navy onto a die cut of Tahitian Tide and adhered to the card front which is then adhered to the rest of the card.  Some Irridescent Rhinestones Basic Jewels finish it of