Posts

Showing posts from April, 2023

Stampin' Up! Happy Forest DSP Good Luck Card

Image
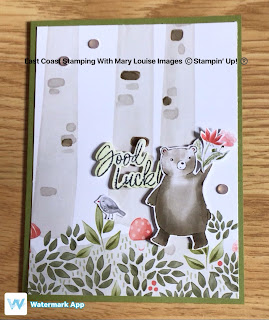
 Good day everyone!  Today's post was based on a sketch that I found on another's demonstrators blog.  You know me and sketchs, we go together like peanut butter and jam.  Haha! This was another fun one where I used mostly Designer Series Paper to create a great card.  Using a fun piece from the Happy Forest DSP layered onto an Old Olive cardbase starts the card off in the right direction.  Then fussy cut a few images from the same paper pack-I did the bear, bird and a few flowers which are adhered to the card front.  The sentiment is from the Charming Sentiments bundle which was stamped using Memento ink onto Basic White cardstock.  Some Old Olive ink and my Blending Brush added some colour to the die cut which was then popped up using Stampin' Dimensionals.  Some Elegant Faceted Gems were added to the project to finish everything off. Materials and measurements: Old Olive cardstock 5 1/2 x 8 1/2 Basic White 4 x 5 1/4 Happy Forest DSP 4 x 5 1/4, images to fussy cut Charmin

Stampin' UP! Sun Prints DSP Birthday Card

Image
 Good day!  I love to paper craft, whether I start with a sketch, fold or colour choice.  It can be so much fun and very rewarding.  I could get caught up with creating and spend a lot of time at my craft table. Today's card is a fun fold that I have made from time to time, especially when I find some DSP that I really like and want to showcase.  That kind of happened here.  The Sun Prints DSP paired with the Night of Navy cardstock is just so regal!  Once you get the cardbase down, the rest is really easy.  A little bit of stamping and adhering and then it's all done! Night of Navy cardbase with the Sun Prints DSP adhered to each of the scored panels as well as  the Basic White insert.  The sentiment is from the Peaceful Moments Stamp set and I used Mememto Ink on Basic White and punched using the Double Oval Punch.  A couple of fussy cut foilage images were added to the sentiment, also from Night of Navy Cardstock and adhered to the belly band.  The band is a strip of Night o

Stampin' Up! Happy Forest Friends DSP Birthday Card

Image
Another sketch, another afternoon edition of stamping with Andrea and I!  You just never know what kind of shananigans we might get into.  It's always a blast! I started with the Calypso Coral cardbase where I adhered the layer of dsp using Stampin' Seal.  Then I stamped a few flower using Blushing Bride and Calypso Coral inks onto Blushing Bride cardstock.  Then I fussy cut them out.  Using the Best Label Punch, the sentiment was cut from Blushing Bride cardstock stamped in Calypso Coral and popped up using Stampin' Dimensionals.  The flowers were put together using Stampin' Seal and Mini Glue Dots and adhered to the card front.  A  bow from the Simply Elegant Trim and a few Irridescent Rhinestones Basic Jewels finished off the card nicely. Measurements and materials: Calypso Coral cardbase 5 1/2 x 8 1/2; scraps for flowers Blushing Bride cardstock, scraps for flowers Basic White 4 x 5 1/4 Happy Forest Friends DSP 4 x 5 1/4 Best Label Punch Hello Ladybug Stamp Calypso

Stampin' Up! Country Floral Lane DSP Friend card

Image
My Sketchintuesday cards are usually based on a sketch that I have seen somewhere and this one proved to be so easy yet pretty.  I think alot depends on colours and patterns of your cardstock you use.  Stampin' Up! makes that easy, no matching needed. My focus today was to use soon to be retired (and possibly already sold out) Country Floral Lane Dsp, one that I first purchased when the mini went live but have not used nearly enough.  With just a couple or more rectangles of dsp and cardstock and a kind sentiment, it equals a really nice card just waiting to be sent. I stamped the sentiment from Nothing's Better Than onto a piece of Petal Pink cardstock using Balmy Blue ink.  Then I started building my layers and applied them to the Petal Pink cardbase.  Of course I stamped on the inside too and added a small strip of coordinating dsp.  A few Pastel Adhesive Backed sequins added the finishing touches.   I have made cards using similar layouts but I never get tired of how much f

Stampin' Up! Flowers of Friendship Thank You card

Image
 Today's card is created using items that will be retiring very soon.  Both the Rich Razzleberry products and the Flowers Of Friendship stamp set will be gone very soon.  I have used the flowers stamp set a fair amount but will admit, the Rich Razzleberry doesn't get used a lot.  Of course, the sketch is from Andrea and you can watch our live on facebook.   I had an oval mask in my stash that I used as a template.  Using my Blending Brush and the Balmy Blue and Blushing Bride ink pads, I created a background that might pass as a sunset or at least a pretty backdrop for the flowers.  Before I removed the template, I stamped the flowers in Memento ink, then removed the template and coloured in the flowers using my Stampin' Blends.  I added a sentiment using Rich Razzleberry ink.  This is adhered to the Rich Razzleberry layer and then popped up onto the Basic White cardbase.  A few Rhinestones which I coloured using the Blackberry Bliss Stampin' Blend were the finishing t

Stampin' Up! Heron Habitat Sympathy Card

Image
This card is using all my colouring mediums, blending, stamping and colouring too! It is pinterest inspired and I shared it with my club gals.  It was so much fun, and even though we all used the same materials, everyone kind of did their own thing. I stamped the Heron onto a Basic White scrap using Memento, coloured with the blends and fussy cut out.  On the smaller piece of Very Vanilla, I first used Daffodil Delight to create a sun affect in the upper right hand corner.  To give a rugged, worn look, I took my scissors and scuffed up the edges all around.  Then I used some Night of Navy to add some colour to the remainder of the piece.  Using the plants and water stamps, I applied markers to each of the elements to create the cat tails and grasses for both the inside and out of the card.  Last for stamping, was the sentiment in Memento ink.  This was all adhered to the Night of Navy panel and then applied to the Very Vanilla cardbase.  One Dragonfly trinket  and the fussy cut Heron p

Stampin’ Up! Amazing Thanks Card

Image
  Good Day!  It's almost the end of the month which means the current catalogues will soon be retiring and many of their contents too.  Today's project showcases a few of those items being retired.  It is always sad to see your favourites go but so exciting to see new, potential go-to's.  The Amazing Thanks dies and the Hues of Happiness will no longer be available.  I will surely miss them! I started with a Daffodil Delight cardbase which I adhered a layer of Hues of Happiness DSP to using Stampin' Seal.  Then I adhered another, smaller coordinating piece of DSP.  I fussy cut a couple of flowers and leaves for both the front and inside of the card.  They are all adhered using Stampin' Seal.  Using Adhesive Sheets with the Night of Navy cardstock, I die cut the thanks from the Amazing Thanks Dies and adhered that to the Daffodil Delight Thanks.  Then, using the Black Mini Dimensionals, I popped them up on the front of the card winding some Linen Thread for added tex

Stampin' Up Tea Boutique Sympathy Card

Image
Hello!   Today's project was the result of a sketch created by my sideline, Andrea which we put together during a facebook live.  I was feeling like something fairly simple but beautiful when I started gathering my supplies to make this card.  Lately, I have had a rush on Sympathy cards so needed to start refilling my bin.   I love to stamp and fold and try new things but today I felt like the DSP really needed to do it's own thing.  I just added some cardstock and pretty ribbon to help it shine!  The cardbase of Tahitian Tide was topped with a layer of Tea Boutique DSP.  A couple of die cuts from Tahitian Tide and Basic White using the Something Fancy Bundle were perfect accents.  Added some Tahitian Tide Metallic Woven Ribbon and Opaque Adhesive-Backed Gems and tada!!! Measurements and Materials: Tahitian Tide cardstock: 5 1/2 x 8 1/2, scrap for sentiment die cut Basic White 4 x 5 1/4; scrap for sentiment die cut Tea Boutique DSP 4 x 5 1/4 Memento Ink Something Fancy Bundle P

Stampin' Up! Butterfly Kisses Thank You card

Image
Good day!  Glad you could pop by for a look! Today's post is from a Sketchin Tuesday facebook live and of course, based off a sketch. This one allowed me to use two pieces of coordinating dsp to create a fun card!  Using the Stylish Shapes Dies, I cut a circle in one piece which layered over the second piece, all adhered to the Basic White cardbase using Stampin' Seal.  I made sure to find the perfect spot in the dsp for the great "window" look.  The sentiment, stamped using Gorgeous Grape ink onto a scrap of Basic White was popped up using Stampin' Dimensionals over a length of Simply Elegant Trim.  Some Glossy Dot Assortments embellishments finished off the card with another great contrast to the dsp. https://fb.watch/jYd7ua5e_8/  Measurements and Materials: Basic White cardbase 4 1/4 x 11; scrap for sentiment Butterfly Kisses DSP 4 x 5 1/4; alternate piece 4 x 4 Stylish Shapes Dies Something Fancy and Heron Habitats Stamps Gorgeous Grape Ink Simply Elegant Trim

Stampin' Up! He's The Man Window Frame Masculine Birthday Card

Image
Today's sketch challenge was fun and I love the card I made with it. Welcome to East Coast Stamping with Mary Louise.   I needed a fun, masculine card and thought this dsp was the perfect fit.  With an Early Espresso cardbase, and two coordinating pieces of He's the Man DSP, it was a cinch to make.  Adhere the first piece of the dsp onto the cardbase using the stampin seal. The smaller, square piece of dsp, you will fold the sides together, then open it up and fold in the opposite direction and open.  This will give you the look of four equal squares shown by the fold lines.  Now turn the square over, and fold each point to the center of the dsp square.  Now fold the tip back to the outside line, after all four tips are folded back, you will have your window frame look like mine below.  Adhere that to the card front using stampin seal.  Add your sentiment onto a piece of Sahara Sand and punch out using Double Oval Punch and pop up using Dimensionals in the center.  Also, stamp

Stampin Up! Design a Daydream Sympathy Card

Image
Hello, and welcome to my blog.  I am EastCoastStampingwithMaryLouise from Nova Scotia.  Today's project was completed during a facebook live based on a sketch for Sketchin Tuesday.  I love sketches just as much or more than I love Stampin' Up! products.   This sketch allowed me to do quick and simple stamping and layering but yet create a beautiful card. I stamped images from the Forever Fern stamp set and sentiment from Peaceful Moments using Pool Party and Mint Macaron ink onto a layer of Design a Daydream cardstock.  This was added to a Coastal Cabana cardbase using Stampin' Seal.  A simple bow using Linen Thread and a few Pastel Adhesive Backed Sequins lended a hand to finish off this project.   Measurements and Materials: Coastal Cabana cardstock 5 1/2 x 8 1/2 Basic White 4 x 5 1/4 Design a Daydream DSP 4 x 5 1/4 Forever Fern and Peaceful Moments stamp sets Mint Macaron and Pool Party inks Linen Thread Pastel Adhesive Backed Sequins Mini Glue Dots, Stampin' Seal Th

Stampin Up Lovely In Linen Thank You card

Image
Todays project is so pretty and it was very easy to make.  I wanted something extra special to do for my downlines, so everyone received the pieces to create this card, it was up to them to use their own sentiments, of course.  I love getting packages in the mail to create with and then use them for my own business.  Sometimes it's just the little things that can bring a bit of joy. The larger piece of dsp was adhered to the Evening Evergreen panel and then adhered to the card front.  For the inside, the piece of Basic White and the alternate piece of dsp were both adhered to the Evening Evergreen panel and then adhered to the card base. So much finished already!  For the focal point, a piece of Basic White and Evening Evergreen were die cut using the Something Fancy dies (each piece used a different die to allow the ribbon to pass through but still showed the Evening Evergreen in the background).  I stamped the sentiment from the Something Fancy stamp using Evening Evergreen.  Adh

Stampin Up Rain or Shine birthday card

Image
Can you say saweeet????  I love this bunny! This card shows that with some cardstock and DSP, you can create with minimal stamping. Use what you have to create wonderful cards. This project I actually created via you tube. I embossed the white panel using the retired Bark 3D Embossing Folder and adhered to the cardbase. The DSP is layered onto the Balmy Blue pieces. Then I fussy cut a few images for the front-bunny and umbrella and adhered with stampin seal. The sentiment is stamped using Memento from the Best Day stamp set onto a strip of Basic White. I used some Glossy Dots embellishments to finish off the card. Measurements and materials: Balmy Blue cardbase 4 1/4 x 11; 2 1/4 x 3 3/4; 1 3/4 x 3 Basic White 4 x 5 1/4 (2); strip for sentiment Rain or Shine dsp 2 x 3 1/2; 1 1/2 x 3 2/4; image to fussy cut for main focus  Thanks for dropping by, Mary Louise   Join me on my other platforms for more crafty fun.

Sketch Challenge using You're a Peach dsp for #throwbackthursday

Image
  Good day!  Don't you agree, that crafting/creating of any kind is better with a friend or friends?  Today's post was made while crafting with my friend and sideline, Andrea who is halfway across the Country.  We have so much fun together, it's hard to say what kind of near fiasco is going to happen while we do create. This sketch she provided can be interpreted many ways and could be a simple shape challenge or you could switch it up altogether.  It's your decision!  While I kind of followed the shapes, I did do a throwback twist.  Everything I used is already retired or is retiring very soon with the exception of the Basic White cardstock, Memento ink and adhesives.   Just because we showcase new products with our cards and videos, doesn't mean that you can't create using what you have in your stash.   Let's get started! For this card, I used the Pale Papaya cardstock for the base as well as the front panel which was die cut using the Stitched so Sweetly

Stampin' Up! Dandy Design Birthday Card

Image
Another day, another sketch!  Thanks to my sideline, Andrea for creating this sketch and inviting me to create with her.  As always, it is so much fun to create with a buddy, even if they aren't in the room with you.  If you want to create along with us, please feel free to.  The more the merrier. For my card, I adhered a layer of the Dandy Designs DSP onto a Balmy Blue cardbase.  Next I stamped the Birthday cake image from Best Day stamp set using Memento onto a piece of Basic White cardstock.  Then I coloured using Balmy Blue and So Safron Stampin Blends and then popped it up using Stampin' Dimensionals.  The sentiment is stamped in Memento onto Basic White and then a layer of Balmy Blue and both punched using the Banners Pick a Punch.  Don't forget your gems....Glossy Dot Assorted.  This was such a fun card, can't wait to give it to someone special.     Materials and measurements: Balmy Blue Cardbase 5 1/2 x 8 1/2, scrap for banner Basic White 4 x 5 1/4, 3 1/4 x 3 1

Stampin' Up! Perfectly Pencilled Sympathy Card

Image
Hey folks! Today's card sketch was used to create a beautiful card. Sadly, I have been needing more and more Sympathy cards lately.  I really enjoyed creating this mostly chromatic card with just a little hint of colour. The sketch was created by Andrea , and we were able to get together to craft together.   I layered a strip of Perfectly Pencilled DSP onto a piece of Basic Black.  A die cut of a coordinating floral piece of DSP is coloured using Old Olive, Real Red and Blushing Bride Stampin Write Markers and then layered onto another die cut of Basic Black.  Once the sentiment was stamped onto the Basic White cardbase using Memento, I adhered all of the dsp and also a small, fussy cut flower to the card front.  The circles are actually popped up using dimensionals.  A few Brushed Butterflies were added.   Materials and Measurements: Basic White cardbase 4 1/4 x 11 Basic Black cardstock 2 1/4 x 5,  piece for die cut Perfectly Pencilled DSP 2 x 4 3/4, coordinating piece for die cut

Stampin’ Up! in the Moment Sympathy Card

Image
Hello, and welcome to my blog.  Today's card was inspired by a sketch found on Instagram and while it is a simple sketch, it packs a lot of beauty and possibilities in it. The colour combinations used here are so beautiful, just one of the many reasons why I enjoy using Stampin' Up! products. A good friend and fellow Guiding sister recently lost her grandmother so I knew I had to find just the right card for her.  The layer of Desert Details dsp is adhered to the Pale Papaya cardbase  Next, I stamped my image and sentiment onto the Basic White piece using Memento, coloured using Stamping Blends,  adhered to the coordinating dsp panel and popped up on to the card front with stampin dimensionals.  Some Elegant Faceted Gems finished off the card.     Materials and Measurements used: Pale Papaya cardbase 5 1/2 x 8 1/2 Basic White cardstock 4 x 5 1/4; 2 1/2 x 4 Desert Details DSP 4 x 5 1/4; 2 3/4 x 4 1/4 In the Moment, Heron Habitat and Peaceful Moments (insert) Stamp sets Memento I