Posts

Showing posts from September, 2022

Stampin Up Amazing Thanks

Image
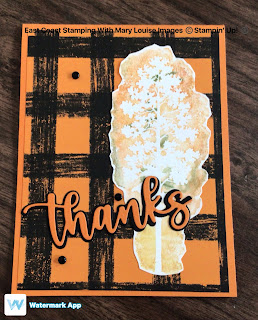
 This fun card makes me feel warm and cozy, like fall and pumpkin spice!  This too was a sketch challenge, that I was quite excited to complete.  Let’s get started….Pumpkin Pie cardbase, with a fun layer of Gingham Cottage dsp.  The tree from the Amazing Silhouettes stamp set was coloured using Mossy Meadow, Cajun Craze, So Saffron and Pumpkin Pie inks.  Since I don’t have all of these colours in markers, I inked up stamp blocks with the colours and using Blending Pens, applied the ink to the stamp.  I then stamped onto a piece of Basic White cardstock and fussy cut out the tree.  Isn’t the effect cool?  Place a strip of Basic Black and Pumpkin Pie cardstock, just large enough for the thanks dies from the Amazing Thanks Die set onto the sticky part of a MultiPurpose Adhesive Sheet.  Next, run the dies through your die cutting machine.  Remove the backing from the Pumpkin Pie thanks and center over the Basic Black thanks.  Next peel off the backing of the black thanks and adhere to card

Stampin UP Twinkle, Twinkle Baby Card

Image
I participate in a monthy group swap and this months theme had me using Dsp, Emboss and Purple/Pink so I dug deep into my stash and found some great retired DSP and an appropriate retired stamp set too!   Using a fun layout that I found recently, I was able to use some bits and pieces of the paper I found.  I'm sure we all have that never ending stash of scraps that never seem to get cleaned up.   So I found some cute coordinating patterns focusing mostly on the Petal Pink designs and adhered them to the Soft Sea Foam square.  I stamped the Basic White using a sentiment from the Baby Pull Toys stamp set using Soft Sea Foam then ran it through my embossing machine using the Framed Tulips Embossing Folder.  I believe this was one of the first folders I purchased when I started stamping a few years back.  This embossed piece was adhered to the card base with Stampin Seal, then the Soft Sea Foam layer was addded.  The Cloud punch was used to punch out cute little clouds from Soft Sea F

Stampin Up Boughs of Holly Christmas Card

Image
Here is another project that we made during our Christmas in July (August) card class last month. It's all about the fussy cutting and showing off the pretty vellum.  Here is how we put it together, hope you enjoy it!  First, I fussy cut the Poinsettia for my main focal image from the Boughs of Holly DSP.  Then I stamped the greeting using Memento on a scrap of Basic White from the Brightest Glow stamp set.  Next I used the curvy die from the Basic Border Dies to cut a curved edge to the card base.  Then I did the same with the piece of vellum.  If the vellum needs to be trimmed down a bit, now is the time to do it using your paper trimmer.   Now add the sentiment using stampin seal, Poinsettia using dimensionals and your embellishments to the card front.  Now add stampin seal to the back of the vellum where it will be covered by the items added to the front and adhere to card front.  Vellum is beautiful to use for projects but the adhesive shows through so you want to place yours

Stampin Up Boughs of Holly Christmas Card

Image
 Good day folks,  Todays card is created using a sketch from Connie Stewart, a Stampin Up demo from USA.  She had featured a quick and easy card sketch and I thought it was brilliant!    Mossy Meadow cardbase with a layer of Boughs of Holly DSP, layers of Mossy Meadow and Old Olive cardstock.  The sentiment from Leaves of Holly stamp set was stamped using Memento onto the Old Olive strip.  I love to fussy cut, so a Poinsettia was the perfect image for this particular card which was added to the strip layers with Stampin Seal.  Using one of the Textural Elements, coloured with Mossy Meadow and Cherry Cobbler Stampin Blends, tuck it underneath the strip layers and attach all to card base using Stampin Dimensionals.   Materials and Measurements: Cardbase- Mossy Meadow, 5 1/2 x 8 1/2, 1 1/4 x 5 1/2 Old Olive 1 x 5 1/2 Boughs of Holly DSP 4 x 5 1/4, poinsettia image Leaves of Holly Stamp Set Textural Element Mossy Meadow and Cherry Cobbler Stampin Blends Memento Stampin Seal, Dimensionals 

Stampin Up Tea Boutique Crafting with friends

Image
 I just love crafting with friends and with today's technology I was able to do that recently.  Andrea and I are side lines and live in two different Provinces so our crafting activities are always online.  We both created cards using a sketch she designed and for once, we both kind of stayed true to the sketch. Andrea My cardbase is Sweet Sorbet which coordinates so nicely with the Tea Boutique DSP.  An added little fussy cut tea pot flanking the Double Oval punched sentiment brings it all together.  Some fine sparkle adhesive backed gems are just the icing on the cake.  Such a great use of dsp and a very versatile sketch.   Materials and measurements: Cardbase-Sweet Sorbet 5 1/2 x 8 1/2 Basic White 4 x 5 1/4, scrap for sentiment Tea Boutique DSP- 4 x 5 1/4 cut into 4 equal squares  Double Oval Punch Nothings Better Than stamp set Memento ink pad Thanks for stopping by,  Mary Louise https://bit.ly/MaryLouiseSocial

Stampin Up Brightest Glow Christmas Card

Image
 One more project from my recent Christmas in July stamp camp which ended up being in August!  This simple but very elegant card stole the show.  Some heat embossing and die cutting and that's it. To begin, we heat embossed using Gold Embossing Powder, on a scrap of Basic White for the center image on the front as well as the inside sentiment.  Next, on to die cuts.  Needed to die cut the front sentiment and then placed the circle and a few of the snowflake dies onto the piece of Soft Succulent cardstock.  You will need to run it through a couple of times to ensure all of the little bits come out of the large circle.  Now it's just a matter of layering using stampin seal and then popping up the sentiment with dimensionals.  Final touches were the Festive Pearls.  Talk about brilliant.  Totally pinterest inspired. Here's a list of materials and measurements: Cardbase: Soft Succulent, 5 1/2 x 8 1/2, 3 3/4 x 5 Basic White, 4 x 5 1/4 Brushed Metalic Cardstock, 4 x 5 1/4 Brighte

Stampin Up Peaceful Deer Step Card

Image
Christmas in July, which ended up being in August, a stamp camp enjoyed by some of my local ladies recently, creating this cute fun fold card. I don't normally like to use retired products when I am doing classes but it happened with this card for the dsp.  But....I am totally certain that each of my participants have a bit of this in their stash so it's a great way to show them how to use it up. I stamped the deer using Early Espresso onto a scrap of Basic White and punched using the Reindeer Punch.  Then I tied a small bow from Linen Thread for his neck and attached using a Glue Dot. He is popped up using Stampin Dimensionals, don't forget to add a couple of embellishments to the front. Then we stamped the trees from the Peaceful Deer stamp set onto Basic White using Garden Green, stamping off each time for the smaller trees and added the sentiment in Early Espresso.   Like the forest look!  This is then adhered to the panel of dsp(2 3/4 x 5 1/4) for the front and then ad

Stampin UP Pampered Pets Sympathy Card

Image
 How about a little #throwbackthursday post to switch things up a bit?  I wanted to make a card for a friend that had recently lost her cat and I knew just exactly where to start.  I had a little bit of the Playful Pets dsp left from a few years ago so I paired that up with a Soft Suede cardbase and added a layer of Flirty Flamingo which I had embossed with the dots embossing folder (also an oldie but goodie).  I punched a Soft Suede heart using a Heart Punch (retired) and fussy cut a cute kitty for the front.  I stamped in Flirty Flamingo using the Pampered Pets Stamp set and tied a little bow using some bakers twine.  The twine is so old, I don't remember what it is called but it was the perfect match for this card so win win for me. It is always sad when you have to make a sympathy card, but I had to look past that and revel in the beautiful card that I was able to offer to her which will hopefully make her feel better. Thanks for dropping by, Mary Louise https://bit.ly/MaryLoui