Colouring Beautifully Penned DSP
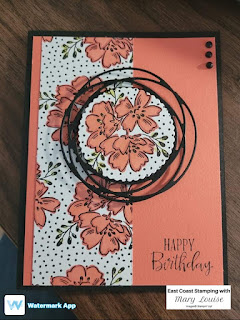
Today, I felt like colouring so I found some dsp to colour along with my Stampin Blends and here it is. The Beautifully Penned dsp was the perfect choice to satisfy my colouring urge. Do you find colouring is a stress reliever? Here are the measurements and step by step instructions. I created this live on facebook today, take a peek over on my page. East Coast Stamping with Mary Louise
Supply List:
Cardstock:
Basic Black-cut at 5 ½”x 8 ½” scored at 4 ¼”; scrap for die cut
Calypso
Coral-cut at 4”x5 ¼”
Basic
White-cut at 4”x5 ¼” for insert
Beautifully
Penned dsp- cut at 2” x5 1/4”; image for
center, approx. 2 ¼” in diameter for die cut
Ink:
Memento
Stampin
Blends: Old Olive light, Calypso Coral light and dark
Stamp
Sets: Peaceful Moments
Painted Labels Dies; Layering Circle Dies
Embellishments:
Matte Black Dots
Adhesive, Dimensionals
Paper Trimmer
Stampin Cut & Emboss Machine
Step- By- Step Instructions:
Stamping:
Using the Calypso Coral matte, stamp your sentiment on the front using Memento
ink.
I
also like to finish the inside of my cards so I then stamped a verse for the
inside also using memento ink.
Using
the Basic Black cardstock, die cut from the Painted Labels die; die cut from
dsp using the Layering Circle Die to fit circle of Basic Black die cut.
I
outlined all of the flowers using the dark calypso coral stampin blend, then
coloured in using the light. The leaves
are all coloured with Old Olive.
Now let’s assemble our
card:
Layer the dsp to the
front, left of your Calypso Coral layer, then adhere both to the cardbase. Adhere the circle of dsp to the inside of the
Basic Black die cut, then add dimensionals to the back and place onto the card
front. Add three Matte Black Dots in the
upper, right hand corner and glue in the insert.
This is a card that could be massed produced if you really enjoy colouring as much as I do. Hope you enjoyed my card.


Comments
Post a Comment