Beautifully Penned Puzzle Card
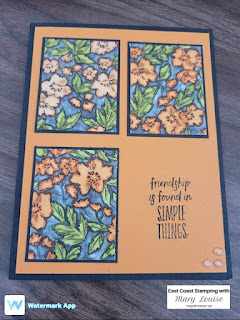
I love new layouts, techniques and folds and I especially enjoy sharing them with friends. This card is one I have made a variation of before but never realized it had it's own name until I was scrolling Pinterest. I don't remember who had posted it, but it is a puzzle card. Yes, there is one piece missing in the bottom right hand corner, but when you open the card....voila! There is the missing piece. Too cute!
I decided to use the Beautifully Penned dsp and colour it with Pumpkin Pie Stampin Blends and I love how it turned out.
Supply List:
Cardstock:
Basic Black-cut at 5 ½”x 8 ½” scored at 5 1/2”; 4 pieces 2 ¼”x 1 ¾”
Pumpkin
Pie-cut at 4” x 5 1/4”
Beautifully
Penned dsp-4 pieces cut at 1 ¾”x 2 ¼”
Ink:
Memento ink pad; Pumpkin Pie light and dark Stampin Blends and Old Olive light
and dark Stampin Blends
Stamp
Sets: Enjoy the Moment
Adhesive
Embellishments:
Wonderful Gems
Paper
Trimmer
Step- By- Step Instructions:
Stamping:
I stamped the sentiment in the lower right hand corner from the Enjoy the
Moment stamp set in Memento ink. If you
want your empty space in one of the other corners, just stamp accordingly.
I
coloured each of the pieces of dsp using the dark colours first for outlines,
leaf veins and flower centers in Pumpkin Pie and Old Olive. Then I blended in with light of each to
finish off the pieces.
Now let’s assemble our
card:
Now it’s just a matter
of layering the pieces and adhering them down.
I used stampin seal for all of my work, but use whichever adhesive you
like the best.
I started by adhering
the dsp to the black mattes and then placing them onto the card front making
sure to have them centered as much as possible.
Then add the Pumpkin Pie layer to the cardbase. Place three of the clear gems from Wonderful
gems in the bottom, right hand corner.
If you have chosen a different corner to leave open, I would suggest the
gems go there.
Place the last layered pieces on the white insert so it aligns with the open corner of your card front. Glue down to inside of card.
This card was fast and easy to prep, colour and put together as I wasn't terribly fussy with the colouring. For sure it would be easy to mass produce, especially if you use a stamparatus for the sentiment. I wanted a more vertical sentiment so it would use up more of the void space and this was the perfect fit! Hope you will give it a try.


Comments
Post a Comment