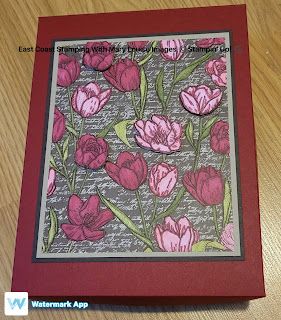
Stampin Up Abigail Rose 3D card box
Good day! Today's project is one I made for my sister for Christmas but you could alter the colours and design to suite whatever occassion you wish. I have gifted various greeting cards to her in the past and she kindly reminded me in November that she was running out and needed a refill. The cards were the easy part, but I wanted something extra special for what the cards would be in. Since I had purchased something different in the past, this time I wanted something handmade.
I found a tutorial on Pinterest from another Stampin Up demo, Sam Hammond and followed her basic design. I did the top my own way, but here is her step by step instructions. Once the basic box is complete, you can decorate it anyway you wish. I chose the Abigail Rose dsp and coloured using Stampin Blends Cherry Cobbler, Mossy Meadow and Petal Pink. I layered this on to Crumb Cake and Early Espresso cardstock before adhering to the Cherry Cobbler box top. You will see some fussy cut flowers added also, once they were coloured. Adding some Basic Pearls and finally tying with some black ribbon I had on hand completed my gift. The box held 24 cards and envelopes. This truly was a labour of love and I have already heard that she loved it! I can see more of these being made in the future.
Materials and measurements:
12 x 12 Cherry Cobbler cardstock for bottom cut at 12 x 10 scored @ 2" along all four side
10 x 8 Cherry Cobbler cardstock for top scored at 1" along all four side
Abigail Rose dsp 4 x 6
Crumb Cake cardstock 4 1/4 x 6 1/4
Early Espresso cardstock 4 1/2 x 6 1/2
Stampin Blends Cherry Cobbler, Mossy Meadow, Petal Pink
Basic Pearls
Stampin Seal; Stampin Dimensionals
Thanks for stopping by,
Mary Louise
https://bit.ly/MaryLouiseSocial


Comments
Post a Comment