Posts

Showing posts from December, 2023

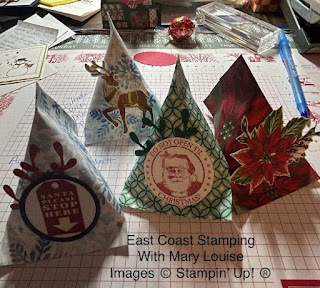
Stampin' Up! Christmas Treat Holders
Image
 Hey guys!   I haven't done a throwback Thursday post in awhile and I have been making some super cute treat holdes using some retired products so why not? Now, I did not invent the directions to this holder, but a fellow crafter (and my downline), Jackie gave them out to all at our last card club and I just knew I had to make some. I used various sheets of dsp, all Christmas this time around.  Added some die cuts that I have had laying in a box on my table, some were images fussy cut from dsp.  I am filling them up with some Christmas candies and giving out to some work peeps, and a few others from the community.  Keegan and I actually made one for his teacher too! Here is the post from the original crafter: https://www.pinterest.ca/pin/144044888074870830/ Use what you have and have fun with the designs.  4 x 6 sheets of dsp are the perfect size but use what you have an adjust accordingly.  Don't have any dsp?  Make your own! Thanks for...
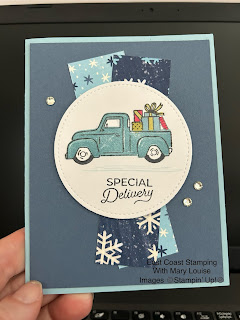
Stampin' Up! Trucking Along Christmas Card

Image
Hey folks!  I have stamped this truck is many colours already, not sure which is claiming top contender but I am loving this Balmy Blue version.   The sketch was designed by my side line, Andrea and we did a facebook live to create using this sketch.  For once, (in a long while), I actually stayed pretty close to on task of the sketch too.   This was so easy to do and ...I know-can't wait to try it with other dsp.  Same old story, right?  The Misty Moonlight layer was adhered to the Balmy Blue cardbase, then the two pieces of dsp were angled and adhered to the card front also.  The Basic White circle die was stamped with the "full" truck stamp using Balmy Blue.  Then the detailed truck stamp used Memento.  I added the gifts on the back with the Memento and coloured in using Stampin' Blends.  I added the sentiment below in Memento and a little bit of "snowy" ground using Balmy Blue. A bit of Wink of Stella added to the details o...

Stampin' Up! Abundant Beauty Decorative Mask Sympathy Card

Image
Hello everyone!  I needed to use the last mask from the Abundant Beauty Decorative Masks and thought this was the perfect time.  I had seen other demos using it, and thought I would give it a try.  The colours were chosen for the base and ink based on the coordinating dsp.  The cardbase is Pecan Pie, the first layer is Grey Granite which I coloured using Pecan Pie ink and the houndstooth mask.  Using my Blending Brush, I added colour over the entire mask until I got the look I wanted.  This was then adhered to the cardbase.  Next, I attached the dsp strips to the front using Stampin' Seal.  My sentiment, from the In the Moment stamp set was stamped in Memento then cut down to the size I wanted and angled on either end.  This is popped up using dimensionals over top of a strand of 2023-2025 In Color Jute Trim which I just made look like loops-no fancy technical term there!  It's all topped off by a few of the Classic Mat Dots.  I jus...

Stampin' Up! Gift of Giving Gift Card Holder

Image
Today's feature is actually a gift card holder-perfect for this time of year! They are so easy to make and always great to have on hand for any occasion.  If you are like me, I am always giving gift cards to someone during the year.  This one will likely be given to the mail driver along with a Tim's card. The Night of Navy cardbase is cut at 4 1/4 x 11, scored at 5 1/2.  Then trim off the last 3 inches to  create the half card front.  The piece leftover will be used as a layer for the main focal image.  Next add the Beary Christmas DSP to the front flap (the piece on the left).  Stamp your image using Memento onto a piece of Basic White, colour and adhere to the remaining piece of Night of Navy.  You can now adhere that to the front flap-be sure to only put adhesvie on the left side, you don't want it to stick to the insert.  Now on to the insert-Stamp your sentiment on the other piece of Basic White, add a piece of dsp if desired and adhere...