Posts

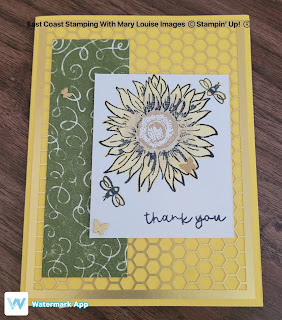
Stampin Up CAS Nothing's Better Than

Image
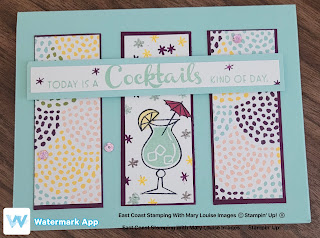
 Today's card is super cute, super simple and super clean.  Perfect for any level of paper crafter and great for mass production for any occasion-just change up the dsp and sentiment and bam!!!!  You are welcome! I love sketch's, they gets my creative juices flowing if I happen to be in a funk.  Even if it's just one component of the sketch that I need for my jump start.... DSP was cut and layered onto the Blackberry Bliss cardstock which was then adhered to the Pool Party cardbase.  The middle piece is Basic White stamped using images from Nothing's Better Than in Daffodil Delight, Blackberry Bliss and Pool Party and the cocktail glass in Memento. The lemon is coloured in So Saffron and the umbrella is Blackberry Bliss.  The sentiment is stamped in Pool Party on Basic White layered onto Pool Party and then popped up using Stampin Dimensionals.  Don't forget the Fine Sparkle Adhesive Backed Gems to seal the deal!  I love a finished inside, so I ad...

Stampin Up Abigail Rose Sweet Songbird Card

Image
Hi fellow paper crafters!   As we move into the fall season, it really doesn't make sense why I created a more springlike project but oh well.  It's cute and why not??? Based on a sketch from my sideline, Andrea , this one was a bit tougher to work through.  I am happy with the end results but see now that I could add another layer of either dsp or cardstock, or even velum, for the open "v" spot on the card.   First I cut the dsp after measuring the center, from point to center on top and bottom.  This creates the V effect.  I placed it on my cardbase just so I knew where to stamp my branch and music notes.  Sentiment was stamped on Crumb Cake using Early Espresson and punched using Double Oval Punch.  This is popped up using dimensionals....on to the cute bird-stamped using Daffodil Delight onto Basic White cardstock and fussy cut.  Don't forget his little eyes!  This too is popped up using dimensionals.  I randomnly cho...

Stampin Up Sweet Sunflower Thank You Card

Image
 Hi everyone! Today's project is combining some awesome Stampin Up products to create a beautiful card.  That's ONE of the reasons why I love these products because you can mix and match so much.  So I took cardstock and dsp and combined with stamp set and die cuts from Paper Pumpkin (august 2022) and the results are....well, take a look for yourself. I stamped the sunflower, bees and sentiment on a piece of Basic White using Memento ink.  Using some blends, I coloured the bees and flower petals, and finished the flower off with Crumb Cake center.  I added a few bees on the insert as well. The cardbase is Daffodil Delight, I added one of the Metallic hive die cuts from the paper pumpkin kit to the cardbase using liquid adhesive and then added a splash of colour with some Rustic Harvest dsp for interest.  I popped up the stamped piece of Basic White using Stampin Dimensionals and added the Brushed Brass Butterflies for the finish! I was able to create based ...

Stampin Up Pretty Prints Designer Series Paper

Image
 Oh, this felt so good to be back in my craft room.  This is the first card I have made since Hurricane Fiona came for a visit this past weekend.  Not that we had a lot of damage, thankfully, but we lost power for about 8 hours.  I work retail, so it's been fun with restocking shelves after some panic buying, storm prep and of course lack of trucks due to closed roads. This card is from a sketch from Andrea , my sideline.  To say that I am so happy to see this is an understatement.  I can see so many different embellishments or dsp for recreating this card, possibilities are endless.  Here is my original card, plus I made a couple of others using various current and retired supplies.  For this card, I cut 2 pieces of coordinating dsp and 1 piece of Basic White, all at 2 x 3 1/2".  I stamped on the Basic White using leaves and flowers from the Lovely You stamp set, Soft Succulent, Evening Evergreen and Calypso Coral inks. These are then arrang...

Stampin Up Santa's Delivery Christmas Card

Image
Finally, the last of our Christmas in July (August) cards.  I loved the class, the participants, the projects, and Christmas, but I am done with these beautiful cards.  Time to move on to next projects.  I think because I started them a few weeks before the original date, then the class got postponed twice and finally happened a month later, I have seen them alot. Let's look at what we have.  I'm not even sure now where I saw this fold, somewhere on Pinterest or you tube, as they are my go to spots for ideas.  I knew I wanted to showcase the Santa's Delivery set and this was perfect!  I hope the littles that I will send this to will enjoy as much as I do. I had already stamped and die cut all of the train elements so everyone took some time to unwind from the day and coloured their pieces.  Then they were adhered to the outside flap of the Basic White piece.  The small strip of Basic Black that holds the sentiment was stamped with Kraft White ink ...

Stampin Up Fun Fold with Penguin Place

Image
This project is another we made at our Stamp Camp recently.  I think he is just the cutest thing ever!!!!!  Cute fun fold with some fun Christmas images will be sure to put a smile on everyones face! Using Basic White and Layering Circle Dies, cut out the circle and stamp the Penguin, bow tie, nose, hat and added snowflakes.  I used Memento for penquin and bow tie, Pool Party for snow flakes, Pumpkin Pie for nose and Real Red for hat.  On the smaller of the two white pieces, stamp the tree in Memento and colour using Mossy Meadow and Real Red blends.  Then add some more Pool Party snowflakes and then sentiment in Memento.  The last piece of white has more Pool Party snow flakes across the top, the "snowbank" effect on the bottom with more Pool Party and then blended, a Mossy Meadow tree and finally the Memento sentiment.  Now you can adhere each of the panels to the cardbase, pop up the Penguin using dimensionals ensuring you only add to the left side ...

Stampin UP Painted Christmas Scrap Christmas Card

Image
 Here's another great project to showcase beautiful designer series papers and using up small bits too!  This is one of the cards we made for our stamp camp recently and it was a great card to get us started.  Simple yet just enough to keep everyone engaged as we settled into the day. Adhere the four pieces of dsp onto the Cherry Cobbler square using stampin seal.  Next, punch out the small oval from Basic White cardstock using the double oval punch, I used the front white layer moving the punch in as far as it would go.  You could also just use a scrap.  Stamp the Joy sentiment using Cherry Cobbler on this oval and then Merry Christmas in Pear Pizzazz on the Basic White Layer.  Evening Evergreen cardstock is used to punch the scalloped oval from the Double oval punch.  Now you can start putting everything together using Stampin Seal.  I did pop up the sentiment using dimensionals and added some Rhinestone Basic Jewels.   Here are t...