#sketchintuesday
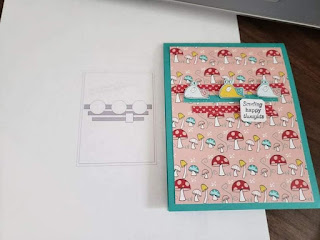
Every Tuesday I create a card from a random sketch given to me by my fellow demo Barb Stortz from Making cards at 1 ink hill. I use the sketch as a basic idea and go from there. This week I focused on using the Snail Mail designer series paper, letting the cute designs steal the show. Yes, I fussy cut out the snails and then used one of my “Many Messages” die cut sentiments to top it off. We have lots of fun chatting and creating, drop by next week to my Facebook page: EastCoastStamping with Mary Louise. Would love your company!
Supply List:
Cardstock:
Bermuda Bay cut at 4 ¼” x 8 ½” scored at 5 ½”; strip of Bermuda Bay cut”
Basic
White cut at 4”x5 ¼” for insert, scrap for sentiment
Snail
Mail dsp-cut at 4”x5 ¼”; 3 scraps-1@1/4”x3 3/4”, 1@ ¼”x2 ½”, 1@ ½” x 4” for
insert; 4 images either die cut or fussy cut for the front and one for insert.
Ink:
Memento
Stamp
Sets: Many Messages and dies
Adhesive,
mini dimensionals
Paper
Trimmer
Step- By- Step Instructions:
Stamping: using the Many
Messages stamp and die, stamp the sentiment in Memento ink, then die cut.
Fussy cut or die cut 4
images from the dsp-I used the snails for all of mine. 3 are for the front, and 1 is for the inside
piece.
Let’s put the card
together now:
Adhere the dsp to the
front of your card, then place the 3 small strips on the front.
Finish the front off by using dimensionals on the snails and the
sentiment.
For the insert, adhere
the last piece of dsp to the bottom of the basic white piece adding the last
snail just above it. Next, adhere this
piece to the inside of the card.


Comments
Post a Comment