Tara's Mystery Pieces Challenge
It's another hot and muggy day here in the beautiful Annapolis Valley, Nova Scotia. I am sitting in my craft room with windows open and the fan on high drinking lots of water to try to keep cool. I am not a fan of warm weather, I usually hibernate for the summer and come out around September. The heat and humidity wreck havoc on my head causing migraines.
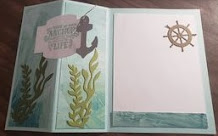
Today I am sharing another mystery pieces challenge, this time from my upline, Tara. Her pieces included the die cuts from the Smooth Sailing Dies. It was perfect, as I don't actually have this set but I do have Sailing Home so it was a great compliment to the pieces. I needed something to act as a background for the seaweed so I pulled in some DSP from the Fine Art pack. It was a bit of a surprise to find the brushed look side of the otherwise floral paper would work with an ocean themed card. I love this fancy fold too, for using small pieces of DSP, and it helps to tell the story of the card in smaller sections. It is my go to lately.
I hope you enjoyed my creation,
Mary Louise
Supply List:
Cardstock: Pool Party122924, Basic White 159276
Ink: Pool Party 147107
Fine Art DSP: 154558
Stamp Set: Sailing Home 149457
Arcylic Block D 118485
Stampin and EmbossMachine: 149653
Paper Trimmer: 152392
Stitched So SweetlyDies: 151690
Smooth Sailing Dies:
149576
Linen Thread: 104199
Stampin Seal: 152813,
Tombow: 110755
Step- By-
Step Instructions:
Using your stampin trimmer, cut your Pool Party
cardstock to 5 ½” x 8 ½” scoring at 4 1/4”, 6 3/8”.
Cut 2 pieces of the dsp at 1 7/8”, scrap for
inside of card 1/2”x3 ¾”
Cut basic white for insert at 3 ¾” x 5”
Die cut your smooth sailing pieces from scraps
using your stampin and emboss machine. (Old Olive and Mossy Meadow for
seasgrass, Smokey Slate for anchor and Soft Suede for wheel) Next, cut the
sentiment piece from Basic White from Stitched So Sweetly Dies.
Now you can start to assemble your card. Start by adhering the pieces of DSP on the
inside flaps of the card. Using tombow
glue, adhere the seagrass to the flaps as shown in the photograph.
For the insert, adhere the small strip of DSP
to the bottom of the basic white cardstock.
Using tombow glue, adhere the ships’ wheel to the basic white
cardstock. Now you can add the basic
white to the inside of the card.
To finish off the front, place adhesive on the
left half of the sentiment and place just half on the front flap. Adhere the anchor to the sentiment piece,
tucking the bottom slightly under the edge.
I used a small piece of linen thread to tie a knot in the anchor top.


Comments
Post a Comment