Christmas in July Snow Wonder-Case the Catty
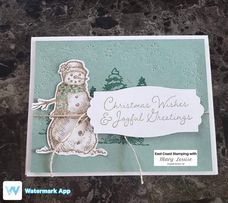
I was very excited to learn that the Snow Wonder stamp set and Snow Time dies were carried over from last years' Holiday mini as it was my only Christmas set I had that was current plus it's totally cute. I decided to case the catty, but did change up the colours a bit. Everyone at our Christmas in July Stamp a Stack seemed to enjoy the mix of Crumb Cake and Soft Succulent which aren't traditionally Christmas colours. When you receive your copy of the Mini catalogue, this cutie pie is found on page 21.
Supply List:
Cardstock:
Basic White 159276-cut at 5 ½”x 8 ½” scored at 4 ¼”; scrap for sentiment die
cut; scrap for snowman die cut
Soft Succulent
155776-cut at 4”x5 ¼”
Ink: Crumb
Cake 147117; Shaded Spruce 146981
Stamp
Sets: Snow Wonder 153344
Dies:
Snow Time Dies 153564
Markers:
Crumb Cake 154962 and Shaded Spruce 154906
Accessories:
Baker’s Twine Essentials Pack 155475
Tear &
Tape Adhesive 154031; Dimensionals 104430
Tools: Stampin' Cut & Emboss Machine 149653; Paper Trimmer 152392
Step- By- Step Instructions:
Stamping:
Ink up the Snowman and “Christmas Wishes & Joyful Greetings” sentiment and
stamp on the scraps of Basic White Cardstock.
Next, stamp the trees using Shaded Spruce and stamp three times across
the center of the Soft Succulent matte.
I like to finish the insides so I stamped the trees on the inside too.
I coloured his scarf using Crumb Cake and Shaded Spruce blends, skipping a few of the squares so it’s not a completely coloured pattern.
Die cut the sentiment and Snowman using the appropriate dies in the Snow Time Dies and then emboss the snowflakes across the top of the matte using the snowflakes included in the die set.
Now let’s assemble our card:
Glue down your snowman
using the tear and tape adhesive allowing a small amount of the trees to show on
the side. Then, using the Crumb Cake
Baker’s twine from the essentials pack, wrap the twine around the front of the
card. Then with a second piece of twine,
make a bow and attach to the first piece of twine-should be a big loopy bow.
Using the dimensionals, pop up the sentiment. Once again, you will want to cover up parts of the trees so they are just peeking out from behind the sentiment. Now you can adhere the finished matte to the cardbase with your adhesive. Now isn't he just the cutest???


Comments
Post a Comment