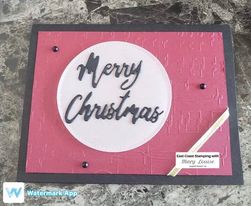
Christmas in July Word Wishes on Vellum
Are you getting tired of seeing Christmas cards yet? I certainly hope not because here comes another one. Again, I featured this at our Christmas in July class recently. It gave me the chance to showcase a new product which blended well with basic tools from the Annual Catalogue-win win for me. I did find that I needed a sharp tool such as the take your pick tool to peel off the letters from the adhesive without tearing them. A little patience will go along way for that one part, otherwise a very simple card. Let's take a peak!
Supply List:
Cardstock:Basic Black 121045 cut at 5 1/2"x8 1/2" scored at 4 1/4";
Basic White 159276-cut at 4x5 1/4"
Merry
Merlot 146979-cut at 3 3/4”x5”
Vellum
101856 3 ½” square
Ink:
Memento 132708
Stamp
Sets: Any Christmas sentiment set
Dies:
Word Wishes 149629: Layering Circle 151770
Embossing
Folder: Merry Melody 156392**not orderable until August 3rd/21**
Stampin
Seal 152813
Black Stampin Dimensionals Combo Pack 150893
Paper
Trimmer 152392
Matte
Black Dots 154284
Adhesive Sheets 152334
Ribbon (I
used retired Gold 1/8” ribbon)
Step- By- Step Instructions:
Stamping:
The only stamping you will be doing, is if you want to add a sentiment on the
inside using Memento on the piece of Basic White cardstock.
Cut
a strip the same size as the Basic Black from the Adhesive Sheet. This will be all you will need. Pull the backing off the sheet and stick down
to the Basic Black Cardstock.
You
will need your embossing machine for a few different things. First, to emboss the Merry Merlot with the
Merry Melody embossing folder, to cut the vellum with the Layering Circle die
closest to 3 ½” across. Place the Merry
Christmas dies from the Word Wishes die set onto the Basic Black strip. (don’t
make the mistake and place on the white or adhesive side, the letters will cut
backwards). Run this through the machine a couple of times to ensure it has cut
completely through.
Now let’s assemble our
card:
Place your ribbon, approx.
3 ½” from corner to corner and adhere to the back of the embossed piece of
cardstock. Next, using stamping seal,
layer the embossed Merry Merlot to the cardbase.
CAREFULLY, using the
take a pick tool or other sharp implement, peel the Merry Christmas from the Basic
Black cardstock. The letters should pop
right out of the cardstock AND the adhesive sheet behind it. The script is fine and won’t allow a lot of
tugging. Once you have those peeled off,
place them onto the circle piece of Vellum.
Phew, almost there and the hard part is over now. Place a few of the small Black Dimensionals on
the back of the Vellum-I found the
bigger letters hid the dimensionals better.
M & Y for Merry and H and M for Christmas were my target areas. You want to hide the dimensionals because
where the Vellum is see through, the adhesive will show through and that would
not be pleasing to the eye. Adhere your
Basic White insert and finally, place a few of the Matte Black Dots on your
card front.
Hope you weren’t too stressed about the adhesive sheets and the letters, it’s totally worth the effort.


Comments
Post a Comment