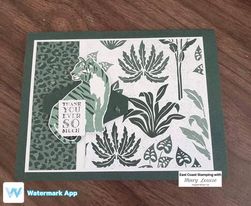
In The Wild with Inspire.Create.Challenge #95 Sketch Challenge
Good evening folks, and what a good evening it is. We started out cool and comfortable this morning, so I rushed around and got my housework done so I could relax later on. Looking forward to a nice evening walk shortly once some of the heat from the sun has died off.
I stumbled upon this challenge a few days ago and thought I would give it a try as it was a sketch challenge and you know me and sketches. It is from Inspire.Create.Challenges and I can't wait to participate in future challenges. You can see what others have done with the sketch here, on their blog: http://inspirecreatechallenges.blogspot.com/
I focused on items from the Annual Catalogue, using the new In Colour-Evening Evergreen and some super fun designer series paper-In The Wild.
I had a lot of fun creating this card, even fussy cutting the fierce cat for the front.
Supply List:
Cardstock:
Evening Evergreen 155574-cut at 4 ¼”x 8 ½” scored at 4 ¼”; scrap for tag punch
Basic
White 159276-cut at 4" x 5 1/4”(matte) ; 4 7/8”x3 ¾”(insert); scrap for sentiment
In The
Wild dsp 155817-1 ¼”x3 5/8”; 3 ¼”x3 5/8”; ½”x5 ¼” (insert)
Ink:
Memento 132708
Stamp
Sets: Many Messages 154510 and Messages dies 154422
Punch: Tailored Tag 145667
Tear & Tape Adhesvie 154031
Mini dimensionals 144108
Paper
Trimmer 152392, Paper Snips 103579
Embellishments: Silver & Clear Epoxy
Essentials 155567
Stampin Cut & Emboss Machine: 149653
Step- By- Step Instructions:
Inking
up the Many Messages stamp set with Memento ink, stamp your sentiment onto your
scrap of Basic White. Then run through the cut and emboss machine using the Messages dies. *I usually stamp the entire stamp set, die cut them and
then keep them nearby for future use.*
Punch
the scrap of Evening Evergreen with the Tailored Tag Punch. Then using the paper snips, fussy cut out the
cat from the designer series paper.
Now let’s assemble our
card:
Layer the two pieces of
designer series paper onto the Basic White matte, leaving a gap between them
and tape them down. Next, tape the white
matte to the cardbase.
The fussy cut image is
secured to the punched piece of cardstock with tape and then using dimensionals,
adhere to the front of the card, centering over the gap between the two pieces
of dsp.


Comments
Post a Comment