Pet Sympathy Card
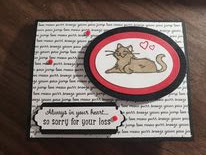
#throwbackthursday creation, I'm just a day late posting...eek! A friend of mine lost her beloved cat yesterday so I thought I would send her a sympathy card. It's always hard when you lose a fur baby. I dug out some retired items to create this project after a quick search on Pinterest for an interesting layout. The dsp, dies and bling are all from past catalogues but I teamed them up with the Pampered Pets stamp set and Banner Pick a Punch. It was a sad occasion to have to create this card for her, but it's been made with lots of Love. I hope she likes it as much as I do.
Supply List:
Cardstock: Basic Black-cut at 5 ½”x 8 ½” scored at 4 ¼”;
scrap for circle layer and sentiment layer (1”x3”)
Real Red- scrap for circle layer
Basic White- cut at 4”x5 ¼”; scraps for sentiment (3/4”x2
7/8”) and circle layer
Playful Pets DSP-4”x5 ¼”; 1/2”x5 1/4”
Ink: Memento; Real Red
Stampin Blends: Crumb Cake light and dark
Stampin Write Marker: Petal Pink
Stamp Set: Pampered Pets
Punch: Banners Pick a Punch
Dies: Ovals
Adhesive, mini dimensionals
Paper Trimmer
Die Cut Machine
Step- By- Step Instructions:
Stamping:
Using the cat image and Memento ink, stamp onto the scrap of basic white
cardstock. I then added some hearts
using real red ink. Next, take the small
strip of basic white cardstock and stamp the sentiment. Colour the cat image using crumb cake stampin
blends and petal pink stampin write marker.
Die
Cutting: Using the three ovals (2nd, 3rd and 4th
from the smallest) from the Oval dies collection to cut the basic black, real
red and stamped image.
Punch: Using the Banners Pick a Punch, first punch
the ends of the sentiment and then the basic black layer.
Now let’s assemble our
card:
Layer your dsp matte onto the cardbase and attach with adhesive. Then attach the sentiment to the black layer with adhesive, then, using dimensionals secure to the card front. Layer the white circle onto the real red layer and then onto the basic black layer with adhesive. Finally, pop that up with dimensionals. I added a few red gems to mine just to give it some colour. For the insert, I added the small strip of dsp to the bottom of the Basic White and then adhered it all to the inside of the cardbase.


Comments
Post a Comment