#sketchintuesday 07/21/21 Penguin Place
Good afternoon, today we are having a very overcast day. Rain and possible thunderstorms are forecasted and I really hope we get both! It has been so very hot and humid lately, it's been very difficult to stay cool and craft.
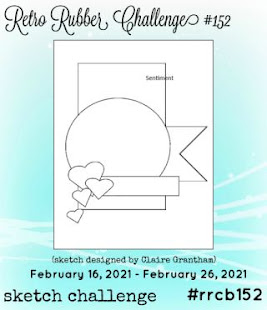
Today I am featuring a card I made last night during a facebook live. Each Tuesday I go live and create a card using a sketch that a fellow Stampin Up demonstrator (Barb Stortz) finds online and sends to me.
This week, I featured the Penguin Place bundle and free SAB dsp Penguin Playmates. Isn't he just the cutest??? If you want to see the live, pop over to East Coast Stampin with Mary Louise and take a look. https://www.facebook.com/eastcoaststampingwithMaryLouise
Supply List:
Cardstock:
Basic Black-cut at 5 ½”x 8 ½” scored at 4 ¼”; scrap for banner and penguin body
Basic
White-cut at 4 x 5 1/4”; scrap for penguin belly
Penguin
Playmates dsp-3” x 4 ½”; 2”x3 ½”; 2 trees to fussy cut
Ink:
Memento, Calypso Coral
Stamp
Sets: Penguin Place Bundle
Embellishments:
Matte Black Dots
Adhesive,
mini dimensionals
Paper
Trimmer
Step- By- Step Instructions:
Punch & Cut:
Using
the scrap of basic white cardstock, punch the belly image using the Penguin
Builder Punch, then punch the body from the Basic Black cardstock. Fussy cut your two images, I used a couple of
trees from the dsp. To flag the end of
my dsp, I used my scissors and snipped-gauge the center and cut in and far as
you want the flagged end to be. Then I
cut diagonally from either side to that center point to create the “triangle”
look.
Stamping:
Using
Memento ink, stamp your sentiment in the top, right hand corner of the dsp. While you have the Memento out, you can also
stamp the “eyes” for the penguins face.
I chose Calypso Coral for the nose which you can stamp now. I like to finish the inside of my cards, so
this is when you could put a sentiment on the Basic White piece. I also inked up the penguin body stamp and
stamped the image in the bottom, left hand corner on the insert.
Now let’s assemble our
card:
We are down to simply layering now, adhere the dsp matte to the front of your Basic Black cardbase slightly offset, using stamping seal. Then add the banner piece about ¾ of the way down, again using stamping seal. Now you can add the small strip of Basic Black on top of the banner strip, I matched it up with the banner piece on the left side. Glue your penguin pieces together and add to the banner piece of dsp using dimensionals and now add your fussy cut images to the left of the penguin. I finished the card off using three of the matte black dots in the upper lefthand corner.


Very cute card! I love my penguin set
ReplyDelete