Mystery Pieces Challenge using Gold Foil
You'd never know it was 9 degrees this morning when I left for work as it's now a scorcher at 27. Not sure what the humidex is but I do know it has turned out very warm.
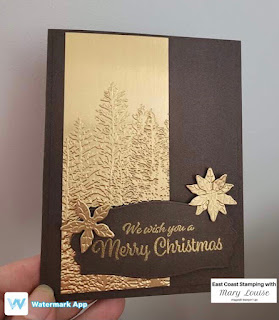
Today's card is yet another mystery piece challenge from teammate Valerie and boy did she have me stumped. Her pieces were three Poinsettia petals which were cut and embossed in gold foil using the Poisenttia Petals die set as well as a piece of gold foil run through an embossing machine using the Evergreen Forest 3D folder. I knew I needed to do something extra special to compliment the beautiful embossed details in the pieces. I needed them to pop out and knew it had to be something dark to achieve the look I wanted. After a quick scan of Pinterest for inspiration, I found exactly what I needed. Take a look here:
Supply List:
Cardstock:
Early Expresso-cut at 5 ½”x 8 ½” scored at 4 ¼”; 4”x5 ¼”;scrap for sentiment
Basic
White-cut at 4”x5 ¼”
Gold
Foil-2 ¼”x5 ¼”; scraps for poinsettias
Ink:
Versamark
Stamp
Sets: Holly Jolly Wishes; Snow Wonder
Dies:
Poinsettia; Snow Time
Embossing
Folder: Evergreen Forest
Stampin’
Emboss Powders: Metallics
Heat Tool
Stampin Cut & Emboss Machine
Paper Trimmer
Adhesives: Mini Glue Dots; Stampin Seal; Stampin Dimensionals
Step- By- Step Instructions:
Stamping:
Stamp your greeting using Versamark on the scrap of Early Expresso, sprinkle
with the Gold embossing powder and be sure to tap off any excess or stray
powder particles. Do this before you
apply the heat from the heat tool to it, once it is set you can’t scrape it
off.
I
also like to finish the inside of my cards so I then stamped a verse for the
inside also using Versamark , Gold embossing powder and then heat set it.
Die
cut the sentiment piece using the Snow Time Dies and the Poinsettias using the
Poinsettia Dies. Now you can emboss the
trees onto the Gold Foil using the Evergreen Tree folder.
Now let’s assemble our
card: Layer your embossed gold foiled
trees to the Early Expresso matte using stampin seal. I put mine slightly off center and to the
left. Then add those two pieces to your
card front. I used dimensionals to pop
up my greeting, then used glue dots to stick my Poinsettia flowers onto my
sentiment and also card front.
Adhere your Basic White
piece to the inside of the card.
This really is a
stunning project, am so happy I received these pieces but now I think I am going
to need to do a little retail therapy and purchase them so I can reproduce this
card. Maybe even use a different colour
cardbase next time.
Thanks for stopping by,
Mary Louise


Comments
Post a Comment