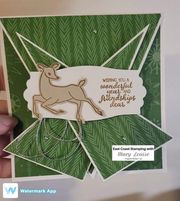
Triple Point Card with Peaceful Deer
This evening I cohosted a fun catalogue launch with teammate Andrea from Prairie Sky Paper Crafts. Peaceful Deer bundle was my focus along with the triple point card layout. I have loved this fancy fold since I first laid eyes on it, why wouldn't I? There was just one problem with the versions I had seen on Pinterest and in blogs and that was the base was made using 12x12" cardstock. I have never bought that size so I decided to change up the measurements to use something more user friendly. This card is now using 8 1/2"x 11" cardstock actually being cut at 5"x10".
Supply List:
Cardstock:
Basic White-cut at 5”x10”scored at 5”; 5”x5”; scrap for sentiment
Sahara
Sand scrap for deer
Peaceful
Print dsp-2pieces cut at 4 ¾”x4 ¾”
Ink: Soft
Suede
Stamp
Sets: Peaceful Deer
Punch
Deer Builder Punch
Dies Snow
Time
Embellishments: Simply Elegant Trim; Metallic Pearls
Stampin
Seal
Dimensionals
Paper Trimmer
Stampin Cut & Emboss Machine
Step- By- Step Instructions:
Cutting: Using the Basic White
scrap, die cut your greeting piece using the Snow Time dies.
Your cardbase is scored at 5”, then
you need to find the center of the front, bottom flap (2 ½”) and cut from each
corner to that center point and cut on diagonal. Keep those pieces, you will need them.
One piece of the dsp will be your
insert, no need to cut anything with that one.
The other, you will need to find the center and trim from each corner to
that center mark diagonally. This should
form a point.
The last piece of Basic White that
you have, find the center again, and trim from each corner diagonally to that
center point. This will be another part
of your insert.
Stamping:
Stamp the deer image onto a scrap of Saraha Sand cardstock using Soft Suede
Ink. Next, stamp your sentiment onto the die cut piece of Basic White using
Soft Suede ink again.
I
also like to finish the inside of my cards so I then stamped a verse and the
laying down deer for the inside also using Soft Suede.
Line
up your stamped deer image into the Deer Builder punch and punch it out.
Now let’s assemble our
card:
Layer all of your pieces
together now using Stampin Seal: full piece of dsp for inside, as well as the
Basic White triangle piece.
For the front, layer all
of your pieces and adhere. Now you will form your three points for your card. Putting some stampin seal on the back of the first of your two side angles (which you have previously layered your dsp onto), carefully lay it down on the card front. You will want to ensure your two points are both within the card parameters watching both the bottom and the side. Stick that piece down. Now do the same with the second piece and adhere that down. Your three points should now be at the bottom of your card front.
Adhere your deer punch out to your greeting piece and place dimensionals on the back making sure you don't place them too close to the edges-you don't want them to be seen from the inside of the card when you open up the flap. Cutting about 6" of the silver twine, loop into a couple of circles, hold them together with a glue dot and place on the back of the sentiment piece. Now place onto the card front. Lastly, finish off with a few of the Metallic Pearls.
This card seems like a lot of steps, but it really is quite easy once you can visualize how it all falls into place.


Comments
Post a Comment