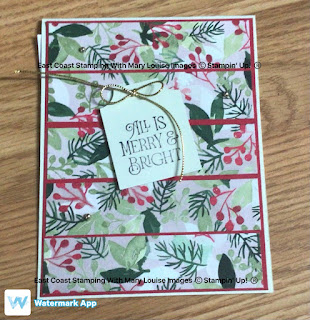
Stampin Up Painted Christmas DSP Strips Card
Hey! Can you imagine this heat??? As I am writing this post, we are smack dab in the middle of a week of high 20's and into 30's with humidex. My work in my craft room is being done early so I can retire for the rest of the day in front of an air conditioner or fan elsewhere.
This project was created to use for my launch party for the July-December mini catalogue earlier this month. The featured products being the returning dsp Painted Christmas, new stamp set-Brightest Glow and the popular Festive Pearls embellishments.
Simple cuts, stamping and layering for this card makes it an easy one to mass produce and perfect for any occasion by simply swapping out the dsp and sentiment. Let's take a look!
Cardbase (Soft Sea Foam)-4 1/4 x 8 1/2, scrap for punched sentiment;
Layer (Real Red)-4 1/8 x 5 5/8;
Insert (Basic White) 4 x 5 1/4
DSP (Painted Christmas)-4 x 5 1/4 then cut into 1 x 5" strips; strip 1/2 x 4 for insert
Essential Tag Punch
Brightest Glow Stamp Set
Simply Elegant Trim
Festive Pearls Embellishments
Memento Ink
Dimensionals, Stampin Seal, Mini Glue Dots
Once the dsp has been trimmed down, adhere to Real Red leaving a slight gap in between each piece. Now adhere this to the cardbase using Stampin Seal. I added a small strip of dsp to the white insert for some colour and adhered to inside of card.
Super simple but very effective!
Thanks for dropping by,
Mary Louise
Want to see more? https://bit.ly/Mary/Louise/Social


Comments
Post a Comment