Stampin Up Boughs of Holly Ribbon Technique
Good day stampers,
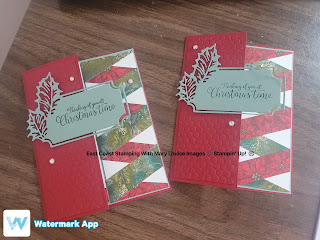
I am still posting projects from our Christmas in July (August) class. This was probably my favourite of the day as I love a new to me technique and the ability to use scraps of beautiful dsp. Once you get the ribbon technique and follow all of the directions and measurements, the rest is a breeze. Don't overthink it and remember, just because it doesn't look like mine or the person sitting next to you, it's still your artwork and be proud!
Using the die from Holly Berry Dies, I cut out the Leafy Label from Soft Succulent and then stamped using the sentiment from Greatest Part of Christmas (retired) with Evening Evergreen. Run the smaller piece of Cherry Cobbler through the embossing machine using the Hive 3D Embossing Folder and adhere to front flap of cardbase. Next add the layer of Soft Succulent to the inside of your card base using Stampin Seal. I added a thin strip of dsp to the unmarked piece of Basic White and adhered that to the left hand of the insert on top of the Soft Succulent layer. Now onto the Ribbon Technique. I will map out the instructions but if you need a video, there are several on you tube you can access. Starting with one of the pieces of dsp, add adhesive and place on diagonal ensuring top right corner of dsp lines up with the first mark on right hand side of basic white cardstock. Angle it so the top of the dsp meets the top of the basic white cardstock. Following this direction, keep adding three more pieces, it's okay if they are longer than the white is wide, you can trim off excess and as you can see from mine, the top and bottom pieces won't be full pieces. So once you have those four done, now you will start with the other four pieces. Adding adhesive, place the first piece of dsp on a diagonal, ensuring bottom of the strip lines up with the bottom of the strip on the left hand side and line it up with the top, right of the Basic White. Remember, this will only end up being a partial piece. Continue on with the other three strips and trip excess from top and sides. Phew, that's the hardest part and once you get it started, it makes sense. It's a continuous ribbon that doesn't have any breaks in it. Now you can adhere this to the right side of the Soft Succulent layer piece and your insert is completed. Now you can add some Rhinestones and enjoy the beautiful card.
List of products and measurements:
Cardbase, Cherry Cobbler cardstock, cut at 8 1/2 x 2 1/8, scored at 4 1/4; 2 1/8 x 5 1/2
Soft Succulent, scrap for die cut; 4 1/8 x 5 3/8
Basic White, 2 x 5 1/4 marked every 3/4" on each side, 2 x 5 1/4 (only one piece needs the measured marks on it, the second piece is for the insert.)
Boughs of Holly DSP, 3/4 x 2 1/2 (8); scrap for insert
Hive 3D Embossing Folder
Greatest Part of Christmas stamp set (retired)
Evening Evergreen Ink
Rhinestone Basic Jewels
Holly Berry Dies
Die Cutting Machine, Paper Trimmer
Stampin Seal, Stampin Dimensionals
Thanks for dropping by,
Mary Louise


Comments
Post a Comment