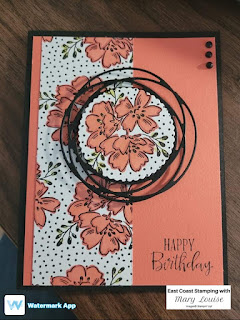
Christmas in July-Tidings of Christmas

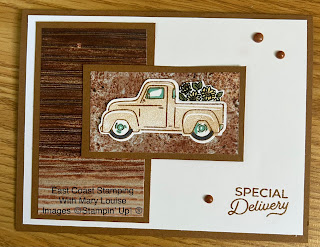
Both of these cards are pretty, but I am only giving supply list for the Cherry Cobbler version. You can easily swap out the colour combo to fit whichever piece of dsp you are using.
Supply List:
Cardstock:
Cherry Cobbler 119685-cut at 5 ½”x 8 ½” scored at 4 ¼”; scrap for sentiment layer
Basic
White 159276-cut at 4 x 5 ¼” ; scrap for sentiment
DSP: Tidings
of Christmas 155718-from one sheet of 6x6, cut one piece 3 1/2"x 5 1/2" and the second piece 2 1/2"x5 1/2".
Ink:
Memento 132708
Stamp
Sets: I used a retired set, but anything with a small Christmas Greeting will
work.
Dies: Basic Border 155558
Punch:
Double Oval 154242; Everyday Label 144668
Tear & Tape Adhesive 154031
Embellishments: Metallic Pearls 146282; Simply Elegant Trim 155766
Stampin dimensionals 104430
Paper Trimmer 152392
Stampin Cut & Emboss Machine 149653
Step- By- Step Instructions:
Stamping:
Using the scrap of Basic White, stamp your greeting in Memento and punch from
the small oval in the Double Oval Punch.
I
also like to finish the inside of my cards so I then stamped a verse for the
inside also using memento ink.
Take the smaller of the two pieces of dsp along with the zigzag die from border dies set and run them through your embossing machine. I placed the die down each side, be sure to place on the top of the piece you want to be the top so the stitched look is achieved for both right and left edges.
Now with the label punch and the larger piece of dsp, punch out a label to use for sentiment layer. Slide the dsp all the way into the punch, trying to be somewhere near the center and punch. Don’t fret, the whole you have created will (or should) be covered up by the second layer which has been die cut. Punch a second label using the scrap of Cherry Cobbler for the sentiment layer.
Now let’s put the card together.
Decide which side you want for the matte and glue that down. Next, adhere the second piece of dsp on top, see, the hole is gone! Now we will layer the sentiment, stamped piece on top of the dsp piece which I have going the opposite way and then finish off with the Punched Cherry Cobbler which is going the same way as basic White piece. Whew!
With a piece of the trim, about 3 1/2”, wrap in a couple of circles -almost like a lassoo. I held the loops together with a glue dot. Place this down on your card front where you want your sentiment layers to go. Then pop your sentiment layers up with dimensionals and place on top of the trim circles. Whichever colour trim you used, choose the same colour of pearls and place around the front of your card.
Oh, I almost forgot, you can use the last little strip of dsp cut from your 6x6 dsp and adhere it to the Basic White insert and place inside. I hope you enjoyed making this card as much as I did.

Comments
Post a Comment