I recently held an in person gift card holder class and these are the projects we completed. All designs are from Pinterest, I just put my spin on them. I think I have enough now for a few years!!
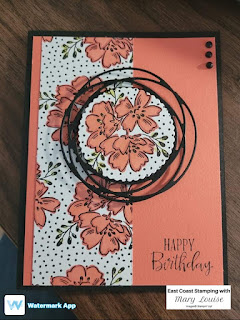
Today, I felt like colouring so I found some dsp to colour along with my Stampin Blends and here it is. The Beautifully Penned dsp was the perfect choice to satisfy my colouring urge. Do you find colouring is a stress reliever? Here are the measurements and step by step instructions. I created this live on facebook today, take a peek over on my page. East Coast Stamping with Mary Louise Supply List: Cardstock: Basic Black-cut at 5 ½”x 8 ½” scored at 4 ¼”; scrap for die cut Calypso Coral-cut at 4”x5 ¼” Basic White-cut at 4”x5 ¼” for insert Beautifully Penned dsp- cut at 2” x5 1/4”; image for center, approx. 2 ¼” in diameter for die cut Ink: Memento Stampin Blends: Old Olive light, Calypso Coral light and dark Stamp Sets: Peaceful Moments Painted Labels Dies; Layering Circle Dies Embellishments: Matte Black Dots Adhesive, Dimensionals Paper Trimmer Stampin Cut & Emboss Machine Step- By- Step Instructions: Stamping: Us...
Hey everyone! It's been a minute since I have made any kind of posts and I was feeling like I needed to share my most recent trip to the craft room. To be honest, I can't remember the last card I made, my focus has been on other crafting endevours and I'm also very involved in Girl Guides and that has been very busy for me. While going through my card stash and checking my Christmas card list, I realized I needed to make a few to complete my list. Not gonna lie, pretty much everything I used on this card is retired but very much loved so why not? The Santa from Santa's List was one of my early purchases and even though it's long been retired, it's been one of my favourite Christmas stamp sets. The recipient of my card that I needed today has some littles and she is a little at heart so it was the perfect fit. Certainly not my design, but I did swap out the dsp, and some of the tools used. Here's what I did: I stamped all of my pieces first...
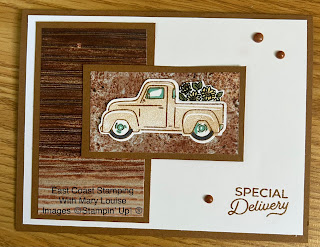
Today's project was created by following another demonstrators clues for Mystery Stamping. It was a live recording during my 9th Anniversary of being a Stampin Up demonstrator celebration. Every chance I have to create using dsp pieces makes my heart happy. My original intent was for this to be a masculine card until I added the cute bouquet of sunflowers to the back of the truck. That kind of blew it but I still love it! I stamped the sentiment onto the card front before I started to put pieces together. Then it was putting dsp layers to cardstock. The truck was stamped onto a piece of Basic White scrap using Pecan Pie-full strength for the truck detail stamp, then stamped off for the "full" truck. I added Black Stampin' Blends for the tires, Bermuda Bay for the glass effect and also the hubcaps. So Saffron, Mossy Meadow and Pecan Pie completed the flowers. I punched out the truck and fussy cut the flowers. A few Adhesiv...


Comments
Post a Comment