Posts

Stampin' Up! Mediterranean Blooms DSP Birthday Card

Image
 Today's project features a bit of fussy cutting from dsp, paired with coordinating coloured cardstock to create a great friends birthday card.  The layout is super simple and can be altered to easily accommodate any themed card by switching out the dsp and sentiment.  Stamping with versamark and the "dots" stamp from the Country Birdhouse stamp set on the layer of Lemon Lolly which now can be adhered to the Old Olive cardbase.  Next, add the strip of Mediterranean Blooms dsp to the center of the Lemon Lolly layer.  Stamp the die cut piece of Basic White using Old Olive and the greeting from Country Birdhouse next, and adhere it to the die cut of Old Olive cardstock.  Pop this up using Stampin' Dimensionals and then add the fussy cut image.  I added a bow using Lemon Lolly bakers twine (attached using a mini glue dot) and a few of the Rainbow Adhesive Backed Dots to finish the front.  The insert has the sentiments stamped in Old Olive ink, add ano...

Stampin' Up! Snail Mail Just a Note Card

Image
 Hello and welcome to my blog!  My focus lately seems to be to use some of my beautiful retired designer series papers that I have in my paper stash.  I'm pretty sure all paper crafters have more dsp tucked away than they will ever use.  I've been paper crafting for over 10 years and my stash shows it!  :)   I love finding new ways to especially use up smaller pieces and this layout didn't disappoint.  My paper choice today was Snail Mail.  I don't think there's a paper in this pack that I didn't enjoy!  And the images are so easy to fussy cut to use as embellishments or focal points.  Bermuda Bay cardstock is what I chose to accent the dsp which is another bonus as it too, is retired.   The cardbase and first layer are both cut from Bermuda Bay card cardstock.  After carefully choosing what I wanted for dsp pieces, they were adhered to the layer using Stampin' Seal.  This is when you would put on any fussy cut i...

Stampin' Up! Country Birdhouse Sketch Challenge Card

Image
 Phew!  It sure is warm here in Nova Scotia today!  It's only mid afternoon and we have already reached the mid 30's without any humidity.  I am trying to keep cool in my craft room beneath the fan and drinking lots of water. Today's project is a mix of current and retired using a sketch from the 2024/25 Annual catalogue found on page 22.  I kept my card pretty basic but you could easily step it up using another layer of either dsp or an embossed piece of cardstock.  The sketch shows four shapes-3 rectangles and a circle.  I didn't choose a circle but my flowers could easily be that circle shape.  That's what I love about sketches...they are a jumping off point for your creativity.  Add what you want.   My cardbase is Granny Apple Green, and my dsp is Hues of Happiness (retired).  I fussy cut one of the many beautiful flower images as my "circle" focal point which is adhered with Stampin' Seal.  I stamped the bird image fr...

Stampin' Up! Happy Little Things Birthday Card

Image
Today's project was inspired by a sketch I had seen online from another demo.  I thought it was a perfect fit for today as the colours match all of the lovely lilacs in bloom right now.   Welcome to my blog!  Sometimes I have a great plan before I start my card and sometimes I don't.  Today I started with a plan and veered slightly once I got to the end but that's okay!  The end result is great and I can't wait to send this to someone!   The strips of dsp are adhered to the Highland Heather layer using Stampin' Seal and then added to the card base.  The sentiment die cut is the square from the Stylish Shapes Dies and turned to allow the words to fit from the Happy Little Things stamp set.  You will see that the stamps have an outline stamp and then a "filler" stamp which I stamped in different colours.  Gorgeous Grape for the outlines and Highland Heather for the filler.   Stamping the inside sentiment in Gorgeous Grape, t...

Stampin' Up! Perennial Lavender Fun Fold Birthday Card

Image
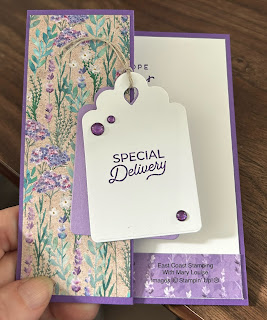
 Good Day!  Here is the second project made for my club gals for this month.  Super easy and so effective of a fun fold.  It is a great way to use up those lost strips of dsp, you could also use dsp you make yourself or even a coordinating colour of cardstock and dry emboss.  Oh the possibilities are endless. I used Gorgeous Grape for my cardbase-not gonna lie...it's a very pretty colour but for whatever reason I rarely reach for it.  Paired with the Perennial Lavender dsp and it's fabulous!  So your cardbase is scored, in half and in half again. Be sure to run your bone folder over the folds a couple of times.  So the strip of dsp is going to be adhered to the first section on the left hand side.  If you open the card in full, the dsp will go on the first scored section on the left.  Next, stamp a greeting on the Basic White piece (if you want one), adhere your strip of dsp and then adhere to the inside of the card.  Phew, alm...

Stampin' Up! Wanted to Say Dies Birthday Card

Image
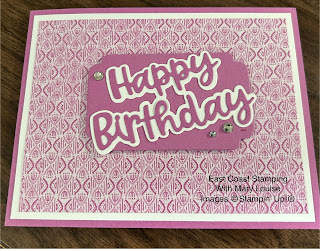
 Hey!  It's me, it's been a minute since I did my last post but I just had to share this super cute card I made recently for my club gals. I really haven't made a big "new annual catty" purchase yet but I knew I needed some of the new in colors cardstock and coordinating dsp.  In prepping all of the cards, I really got to appreciate the new colours and decide which ones I really really liked and which ones I just liked.  Have you made a decision yet? Using the Wanted to Say dies, I die cut out the "full" sentiment from Basic White cardstock.  The defined letters die was used to cut the Petunia Pop cardstock after I attached it to a piece of Adhesive Sheets.  After peeling the backing, you can attach to the Basic White piece.  Next, adhere the sentiment to the die cut using Something Fancy Dies of Petunia Pop. The cardbase of Petunia Pop has a layer of Basic White cardstock and then another layer of the 2024-2026 In Color DSP.  Then you can add the...

Stampin' Up! In The Moment Card

Image
 Todays card is not only based on a sketch (loosely) but also on a technique that I have tried before a long time ago and wanted to revisit. I like how it turned out, however I think I would prefer to have a different sized image to stamp that would be taller than the circle.  But it's still cool! Using a scrap of cardstock that had a circle die cut in it, I laid it on a piece of Basic White and used my Gray Granite ink and a blending brush to colour in the circle.  When I had the desired amount of colour, I lifted the scrap piece and then stamped my image, again using Gray Granite. The image is off to the side of the circle, giving a bit of a different look.  Then I stamped the sentiment below the circle.  I did take a Balmy Blue Stampin' Blend and coloured her hair clip because I thought it needed a little pop of colour.  The stamps are from the In the Moment stamp set.  This layer is adhered to the Gray Granite cardbase, with a little bow from the B...